Free Reindeer Crochet Pattern for Christmas
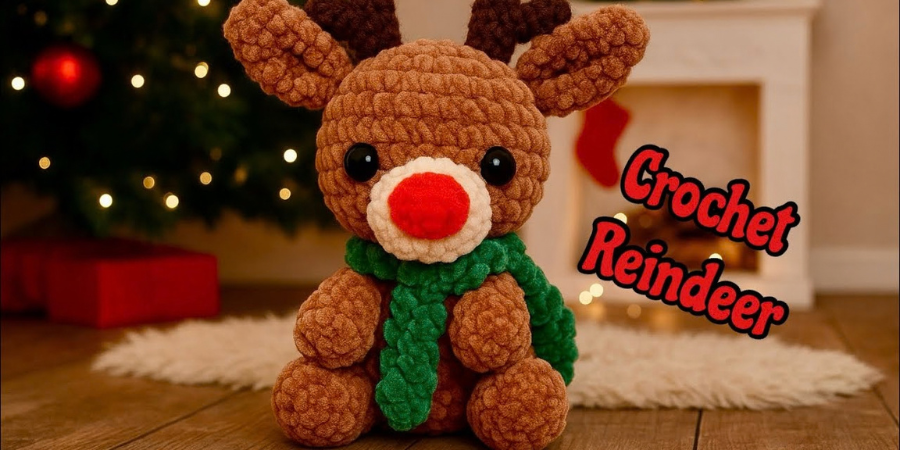
This free reindeer crochet pattern makes a soft little Christmas character with plush yarn, simple crocheted pieces, and a sweet Y-shaped antler design. The head and body are worked as one connected piece, while the legs, arms, muzzle, ears, and antlers are made separately and sewn together.
A green scarf adds the finishing Christmas touch and can be worn in different ways or left off completely. The result is a cozy handmade reindeer that works well as part of a Christmas crochet collection or as a small handmade gift.
Free Reindeer Crochet Pattern for Christmas – the final answer?
Materials
Yarn
- Brown plush yarn
- Cream plush yarn
- Red plush yarn
- Green yarn for the scarf
- Darker contrasting brown double-knit yarn for the antlers
Other Supplies
- 5.5 mm crochet hook
- 3 mm crochet hook
- 12–14 mm safety eyes
- Fiberfill stuffing
- Stitch marker
- Darning needle
- Scissors
The 5.5 mm hook is used with the plush yarn, while the 3 mm hook is used with the contrasting double-knit yarn for the antlers.
The tutorial demonstrates 14 mm safety eyes, although 12–14 mm is the stated range.
Abbreviations
- ch — chain
- sc — single crochet
- inc — increase; work 2 sc into the same stitch
- dec — decrease; work the next 2 stitches together
- sl st — slip stitch
- dc — double crochet
- st/sts — stitch/stitches
- mc — magic circle/magic ring
Crochet Reindeer Head and Body
The head and body are crocheted as one connected piece using brown plush yarn. Work in spiral rounds and use a stitch marker to keep track of the beginning of each round.
The tutorial provides two ways to begin: a slip knot followed by chain 2 and 6 sc into the second chain, or a magic ring with 6 sc.
Head
Round 1
Work 6 sc.
6 stitches
Round 2
Work 6 inc around.
12 stitches
Round 3
Repeat sc, inc around.
18 stitches
Round 4
Repeat 2 sc, inc around.
24 stitches
Round 5
Repeat 3 sc, inc around.
30 stitches
Rounds 6–11
Work 30 sc for 6 rounds.
30 stitches
Add the Safety Eyes
The tutorial demonstrates 14 mm safety eyes.
After the six plain 30-stitch rounds, position the eyes according to the demonstrated placement. They are approximately 5 stitches apart, with both eyes sitting on the same round.
Check the inside of the head before attaching the safety backs to make sure the eyes are aligned.
Shape the Head
Continue with the decrease section.
Next Round
Repeat 3 sc, dec around.
24 stitches
Next Round
Repeat 2 sc, dec around.
18 stitches
Next Round
Repeat sc, dec around.
12 stitches
Final Head-Shaping Round
Repeat 2 sc, dec 3 times.
9 stitches
The work now continues directly into the body.
Crochet the Body
Body Round 1
Work 9 inc around.
18 stitches
Body Round 2
Repeat 2 sc, inc around.
24 stitches
Body Rounds 3–5
Work 24 sc for 3 rounds.
24 stitches
At this stage, begin stuffing the head and body with fiberfill.
Shape and Close the Body
Next Round
Repeat 2 sc, dec around.
18 stitches
Next Round
Repeat sc, dec around.
12 stitches
Continue adding fiberfill as the opening becomes smaller. Make sure the head and body are filled before the final closure.
Final Closure
Work 6 dec.
6 stitches
Close the remaining opening using the closure method demonstrated in the tutorial. The remaining opening can be closed with a darning needle, or additional decreases can be worked before finishing with a slip stitch.
Secure the yarn and hide the tail inside the body.
Reindeer Legs
Make 2 legs using the main plush yarn.
Round 1
Work 6 sc.
6 stitches
Round 2
Work 6 inc.
12 stitches
Rounds 3–4
Work 12 sc for 2 rounds.
12 stitches
Final Leg Round
Repeat sc, dec around.
8 stitches
Fasten off with a slip stitch and leave a long tail for sewing.
Stuff the leg with fiberfill.
Make a second identical leg.
Reindeer Arms
Make 2 arms using the main plush yarn.
Round 1
Work 6 sc.
6 stitches
Round 2
Repeat sc, inc around.
9 stitches
Round 3
Work 9 sc.
9 stitches
Turn the piece and tuck the starting tail inside.
Round 4
Repeat sc, dec around.
6 stitches
Rounds 5–7
Work 6 sc for 3 rounds.
6 stitches
Add a small amount of fiberfill before closing the top.
Work 3 sc across the top to close the opening.
Chain 1, cut the yarn, and leave a long tail for sewing.
Make a second identical arm.
Reindeer Muzzle
Use the main plush yarn.
Round 1
Work 6 sc.
6 stitches
Round 2
Work 6 inc.
12 stitches
Rounds 3–4
Work 12 sc for 2 rounds.
12 stitches
Fasten off with a slip stitch and leave a long yarn tail for sewing.
The muzzle is shaped during assembly rather than being separately stuffed during crocheting.
Reindeer Ears
Make 2 ears using brown plush yarn.
Round 1
Work 6 sc.
6 stitches
Round 2
Work 6 sc.
6 stitches
Round 3
Repeat sc, inc around.
9 stitches
Rounds 4–5
Work 9 sc for 2 rounds.
9 stitches
Round 6
Repeat sc, dec 3 times.
6 stitches
Close the Ear
Close the top with 3 slip stitches through the corresponding front and back stitches.
Chain 1 and fasten off, leaving a long sewing tail.
Pinch or gather the bottom of the ear to create the desired shape.
Make a second identical ear.
Crochet Reindeer Antlers
The antlers use darker contrasting brown double-knit yarn and a 3 mm crochet hook.
Each antler is made from one short piece and one long piece.
You will make:
- 2 short pieces
- 2 long pieces
These pieces are joined to create two Y-shaped antlers.
Short Antler Pieces
Make 2.
Round 1
Work 6 sc.
6 stitches
Rounds 2–4
Work 6 sc for 4 total rounds.
6 stitches
Fasten off with a slip stitch and leave a long sewing tail.
Add a small amount of fiberfill.
Long Antler Pieces
Make 2.
Follow the same construction as the short antler piece, but continue for:
7 rounds of 6 sc
6 stitches
Fasten off with a long sewing tail and lightly stuff.
Join the Antler Pieces
Join one short piece to one long piece to create each Y-shaped antler.
Position the short piece approximately two rounds above the ending point of the long piece.
Use the long sewing tail to stitch the pieces together around the connection.
Secure the join and hide the remaining yarn inside the antler.
Repeat for the second antler.
Crochet Reindeer Scarf
Use green yarn.
Chain
Chain 40
This is the chain count used for the demonstrated scarf.
Scarf Row
- Skip the first 2 chains.
- Work a dc into the third chain from the hook.
- Continue working dc across the remaining chains.
- Chain 1.
- Fasten off.
- Weave in the yarn end.
The scarf can be worn at the front, moved toward either side, or omitted entirely.
Reindeer Assembly
Once all the pieces are complete, assemble the reindeer in the following order.
1. Attach the Antlers
Position each Y-shaped antler near the top of the head.
Use the center of the magic-ring area as the reference point. Position the horn at the edge of Round 2 and center it before sewing.
Sew the antler securely to the head, then secure and hide the yarn tail inside.
Repeat on the opposite side.
2. Attach the Ears
Pinch the bottom of each ear before sewing.
Leave approximately one round between the horn and ear.
Use the horn and side profile as alignment references.
Sew the ear securely to the head and hide the yarn tail inside.
Repeat on the opposite side.
3. Attach the Legs
Use the eyes as alignment references.
Trace a vertical line down from the inside of each corresponding eye and position the leg along that line.
Sew the leg to the body by alternating between one body stitch and one leg stitch.
Reinforce the first and final connections, secure the yarn, and hide the tail inside the body.
Repeat for the second leg.
4. Attach the Arms
Use the side profile as the alignment reference.
Position the arm in line with the ear and horn area.
Sew the arm to the body by alternating between one body stitch and one arm stitch.
Reinforce the attachment points, secure the yarn, and hide the tail inside the body.
Repeat for the second arm.
5. Attach the Muzzle
Position the muzzle centrally between the eyes.
Sew around the muzzle by connecting one muzzle stitch to one head stitch at a time.
Continue until the muzzle is securely attached.
If the muzzle has been pulled inward during sewing, gently restore its rounded shape using the back of the needle or a crochet hook.
Embroider the Red Nose
Use red yarn to embroider the nose directly onto the muzzle.
The final nose size can be adjusted. In the demonstrated version, approximately five parallel strands are used.
Work the yarn through the selected area while keeping the strands evenly spaced.
Secure the yarn, double-knot the ends, and pull the remaining tails inside the head or muzzle.
Add the Scarf
Wrap the finished scarf around the reindeer’s neck.
Move the arms aside while positioning it.
You can leave the scarf centered, move it toward either side, or omit it.
The scarf can remain removable or be lightly stitched in place with a darning needle.
Common Crochet Reindeer Mistakes
Losing the Stitch Count
A missed increase or decrease can change the shape of the reindeer.
Use a stitch marker and check the stitch count at the end of each shaping round.
Uneven Safety Eyes
Check that both eyes are positioned on the same round before securing the safety backs.
Not Adding Enough Stuffing
Add fiberfill while the body is still open and continue filling as the opening becomes smaller.
Leaving the Body Open
If a small opening remains, follow the demonstrated closure method by adding additional decreases if needed and finishing with a slip stitch, or close the remaining opening with a darning needle.
Uneven Limbs
Use the eyes, ears, and antlers as alignment landmarks before completing the sewing.
Antlers Losing Their Y Shape
Make sure the short and long pieces are correctly positioned before sewing the connection.
Flattening the Muzzle
Avoid pulling the sewing stitches too tightly. Gently restore the muzzle’s rounded shape after attaching it.
Reindeer Crochet Pattern at a Glance
Head:
6 → 12 → 18 → 24 → 30 → 6 rounds of 30 → 24 → 18 → 12 → 9
Body:
9 → 18 → 24 → 3 rounds of 24 → 18 → 12 → 6
Legs — 2:
6 → 12 → 12 → 12 → decrease round
Arms — 2:
6 → 9 → 9 → 6 → 3 rounds of 6 → 3-sc top closure
Muzzle:
6 → 12 → 2 rounds of 12
Ears — 2:
6 → 6 → 9 → 2 rounds of 9 → 6 → 3-slip-stitch closure
Scarf:
Chain 40 → dc across
Antlers:
2 short pieces × 4 rounds of 6 sc
2 long pieces × 7 rounds of 6 sc
Join into 2 Y-shaped antlers.
Final Assembly Order
For a smooth workflow, complete the project in this order:
Head and body → Legs → Arms → Muzzle → Ears → Antler pieces → Y-shaped antlers → Antlers → Ears → Legs → Arms → Muzzle → Red nose → Scarf
This keeps the structural pieces organized before the facial and decorative details are finished.
A Sweet Handmade Christmas Reindeer
This little reindeer brings together a soft plush body, simple crocheted components, Y-shaped antlers, an embroidered red nose, and a classic green scarf.
The construction is straightforward once the individual pieces are completed, and the scarf can be personalized or left off depending on the finished look you want.
The original pattern does not provide a fixed finished size, gauge, yarn yardage, stuffing quantity, or exact finished dimensions for the individual pieces, so those details have intentionally been left unspecified rather than filled in from another reindeer design.