Gingerbread Man Crochet Pattern
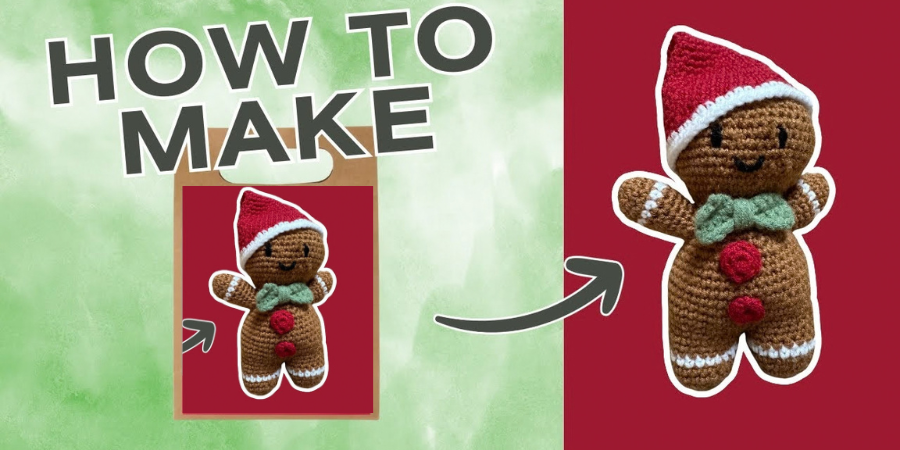
This gingerbread man crochet pattern creates a festive amigurumi character with a brown body, white icing details, red buttons, a red and white Christmas hat, a striped candy cane, a crocheted bow tie, and embroidered facial details. The project is worked mainly in continuous rounds, with increases and decreases used to shape the legs, torso, and head.
The construction starts with two separate legs. The legs are then joined to form the torso, which is shaped before the head is expanded and closed. The arms, buttons, bow tie, Christmas hat, and candy cane are made separately and attached during the finishing stage.
Gingerbread Man Crochet Pattern – The Short Answer?
Materials and Tools
Before starting your gingerbread man, gather the yarn, filling, crochet tools, and sewing supplies.
Yarn
Use the yarn supplied with the gingerbread man kit or compatible yarn in these colors:
- Brown yarn for the main body, legs, and arms
- White yarn for the icing details and white sections of the hat and candy cane
- Red yarn for the buttons, bow tie, and Christmas hat
- Black yarn for the embroidered eyes and smile
- Optional pink yarn for the cheeks
The supporting source mentions medium-weight acrylic or cotton yarn as suitable for this type of amigurumi, but the supplied tutorial is based on a specific kit and does not establish a standardized yarn weight. For that reason, the kit yarn remains the primary material reference.
Filling and Tools
You will also need:
- Polyester fiberfill
- Crochet hook
- Stitch marker
- Tapestry needle
- Scissors
- Optional sewing needle and thread for the pom-pom
- Optional pins for positioning the buttons
- Optional additional yarn for attaching the candy cane
Crochet Hook
The tutorial notes that the hook included in the kit is incorrectly labeled. The tutor uses a 2.5 mm Clover crochet hook for the project.
The kit hook is described as having approximately 2.5 mm on one end and approximately 3 mm on the other. The smaller 2.5 mm side is the one used for the demonstrated project.
Crochet Abbreviations
The pattern uses the following abbreviations:
- MR — Magic Ring / Magic Circle
- sc — Single Crochet
- inc — Increase; 2 sc into the same stitch
- dec — Decrease
- inv dec — Invisible Decrease
- sl st — Slip Stitch
- hdc — Half Double Crochet
- ch — Chain
- st / sts — Stitch / Stitches
- FO — Fasten Off
Important Notes Before You Start
This gingerbread man is worked primarily in continuous rounds rather than joined rounds. Because the work forms a spiral, the beginning and end of a round can create a small visible jog, especially when changing colors. This is normal for continuous-round amigurumi.
Use a stitch marker to identify the first stitch of each round.
Changing Colors
Color changes are made during the final stitch of the previous color. Begin the final stitch normally, stop when two loops remain on the hook, pick up the new color, and pull it through the remaining loops. Continue the next round with the new color.
Keep unused yarn and loose tails toward the inside or back of the work.
Crochet the Main Body
The body begins with two separate legs. Each leg is worked first, and the second leg remains attached to its working yarn so the two pieces can be joined directly into the torso.
Make the First Leg
Work the first leg completely before making the second leg.
Round 1
Make a magic circle and work 6 sc into the center.
Stitch count: 6
Mark the first stitch and pull the yarn tail to close the magic circle.
Round 2
Work 6 increases.
Each increase is made by working 2 sc into the same stitch.
Stitch count: 12
Round 3
Repeat the following around:
- 1 sc
- 1 inc
Stitch count: 18
Rounds 4–5
Work 18 sc around each round.
Stitch count per round: 18
Round 6 — White Icing Section
Change to white yarn during the final stitch of Round 5.
Work 18 sc in white.
Stitch count: 18
Rounds 7–9
Change back to brown yarn.
Work 18 sc around for each round.
Stitch count per round: 18
Finish the First Leg
Fasten off and leave a useful yarn tail.
Before moving on, secure the loose ends while the leg is still easy to turn and access. Work a tapestry needle through several stitches in different directions so the tails cannot easily unravel.
Keep the white tails around the white section where practical. Excess tails can remain inside the leg as part of the internal filling.
Make the Second Leg
Repeat Rounds 1–9 using the same construction as the first leg.
The second leg should have:
- 6 sc in Round 1
- 12 stitches in Round 2
- 18 stitches in Round 3
- 18 stitches through Round 9
- White section on Round 6
- Brown section on Rounds 7–9
There is one important difference: do not fasten off the second leg.
Keep its working yarn active because the two legs will be joined directly into the body.
Secure the initial and white yarn tails before joining the legs.
Join the Legs
Round 10
The two legs are now joined into one continuous body.
Work 18 sc around the first leg.
Then join into the first stitch of the second leg and work 18 sc around the second leg.
Total stitch count: 36
Mark the first stitch of the joined round.
At the end of Round 10, both legs form one continuous body.
Crochet the Torso
With the legs joined, continue directly into the torso.
Round 11
Work:
- 5 sc
- 1 inc
Repeat 6 times.
Stitch count: 42
Rounds 12–16
Work 42 sc around each round.
Stitch count per round: 42
Shape the Torso
The torso now begins to narrow through a series of decreases.
Round 17
Work:
- 5 sc
- 1 invisible decrease
Repeat 6 times.
Stitch count: 36
How to Make an Invisible Decrease
To make the invisible decrease:
- Insert the hook under the front loop of the next stitch.
- Move to the front loop of the following stitch without completing the first stitch.
- Pick up that loop as well.
- Yarn over and pull through the first two loops.
- Yarn over and pull through the remaining loops.
This produces a less visible decrease that works well for amigurumi shaping.
Rounds 18–19
Work 36 sc around each round.
Stitch count per round: 36
Round 20
Work:
- 4 sc
- 1 decrease
Repeat 6 times.
Stitch count: 30
Round 21
Work 30 sc around.
Stitch count: 30
Round 22
Work:
- 3 sc
- 1 decrease
Repeat 6 times.
Stitch count: 24
Round 23
Work 24 sc around.
Stitch count: 24
Round 24
Work:
- 2 sc
- 1 decrease
Repeat 6 times.
Stitch count: 18
Round 25
Work 18 sc around.
Stitch count: 18
At this stage, prepare the buttons and bow tie before continuing into the head. This makes the details easier to attach while the body is still accessible.
Make the Red Buttons
Make 2 red crocheted buttons.
Each Button
Round 1
Make a magic circle and work 10 sc into the center.
Stitch count: 10
Pull the center yarn tail to close the circle.
Then make 1 slip stitch into the first stitch and fasten off.
Leave a sufficiently long yarn tail because it will be used to sew the button onto the body.
Secure the initial center tail by weaving it through several stitches. The finished button should form a compact circular shape. If necessary, use the yarn tail and tapestry needle to help shape it into a round form.
Crochet the Bow Tie
The bow tie is worked as a small rectangle and then shaped by wrapping the center.
Row 1
- Make a slip knot.
- Chain 10.
- Work into the second chain from the hook.
- Make 9 sc across.
Stitch count: 9
Row 2
- Ch 1
- Turn
- Work 9 sc
Row 3
- Ch 1
- Turn
- Work 9 sc
Row 4
- Ch 1
- Turn
- Work 9 sc
Fasten off and leave a long yarn tail.
Shape the Bow Tie
Thread the long tail onto a tapestry needle. Bring it toward the center of the rectangle, wrap it around the middle, and pull it firmly enough to create the bow shape.
Secure the center wrapping through several stitches and keep the remaining tail available for attaching the bow tie to the gingerbread man.
Attach the Buttons and Bow Tie
Attach the two red buttons to the front of the body before the body is fully stuffed.
For each button:
- Position it on the front of the gingerbread man.
- Temporarily pin it if precise placement is helpful.
- Sew through the button and corresponding body stitches several times.
- Keep the button flat against the body.
- Bring the yarn into the inside of the body.
- Secure it with a knot.
- Tuck the remaining tail inside.
Sew the bow tie to the upper front of the body using its remaining yarn tail. Keep it centered and securely attached.
Begin Stuffing the Body
Now begin adding polyester fiberfill.
Push the stuffing down into the legs first, then gradually fill the body as you continue.
Keep these points in mind:
- Add fiberfill gradually.
- Push stuffing down into the legs first.
- Do not overstuff the body.
- Leave enough flexibility to continue crocheting the head.
- More filling can be added before the head is closed.
Excessive stuffing at this stage can make the remaining crochet work more difficult.
Crochet the Head
The head is expanded directly from the torso.
Round 26
Work:
- 2 sc
- 1 inc
Repeat 6 times.
Stitch count: 24
Round 27
Work:
- 3 sc
- 1 inc
Repeat 6 times.
Stitch count: 30
Round 28
Work:
- 4 sc
- 1 inc
Repeat 6 times.
Stitch count: 36
Round 29
Work:
- 5 sc
- 1 inc
Repeat 6 times.
Stitch count: 42
Round 30
Work:
- 6 sc
- 1 inc
Repeat 6 times.
Stitch count: 48
Rounds 31–35
Work 48 sc around each round.
Stitch count per round: 48
Shape the Head
The head now begins to narrow.
Round 36
Work:
- 6 sc
- 1 invisible decrease
Repeat 6 times.
Stitch count: 42
Round 37
Work 42 sc around.
Stitch count: 42
Embroider the Face
The face is easier to embroider before the head is completely closed, so add the facial details at this stage.
Use black yarn and a tapestry needle.
Embroider the Smile
The smile is positioned approximately six rows up from the bottom of the neck.
Bring the yarn out at the beginning of the smile, move across approximately three stitches to establish the other end, then create the lower curve through the center. Return through the opposite side to shape the smile.
Secure the black yarn on the inside.
Embroider the Eyes
The eyes are positioned above the smile.
The tutorial describes skipping approximately one row, bringing the yarn through the next row, moving upward approximately two stitches, and returning through the eye area to create the eye shape. Repeat the same process on the opposite side.
Secure the yarn tails inside the body. The two black yarn tails can also be knotted together internally for additional security.
Continue Shaping the Head
Round 38
Work:
- 5 sc
- 1 decrease
Repeat 6 times.
Stitch count: 36
Round 39
Work:
- 4 sc
- 1 decrease
Repeat 6 times.
Stitch count: 30
Round 40
Work:
- 3 sc
- 1 decrease
Repeat 6 times.
Stitch count: 24
Round 41
Work:
- 2 sc
- 1 decrease
Repeat 6 times.
Stitch count: 18
Stuff the Head
At the end of Round 41, add polyester fiberfill to the head.
Shape the head evenly and make sure there are no large empty areas. Avoid overstuffing, since too much filling can stretch the stitches.
Close the Head
Round 42
Alternate:
- 1 sc
- 1 decrease
Repeat 6 times.
Stitch count: 12
Round 43
Work 6 decreases.
Stitch count: 6
Do not fasten off conventionally. Leave a yarn tail for the invisible closure.
Invisible Close
- Thread the yarn tail onto a tapestry needle.
- Work around the outer or back loops of the remaining stitches.
- Move above and below each stitch around the opening.
- Pull the yarn tail to draw the opening closed.
- Weave the remaining tail through several internal stitches.
- Pull it through the body.
- Trim the excess.
- Gently manipulate the piece so the remaining tail stays hidden inside.
The main body is now complete and closed.
Crochet the Arms
Make 2 arms.
The arms are worked separately and should not be heavily stuffed.
Round 1
Make a magic circle and work 6 sc.
Stitch count: 6
Round 2
Work 6 increases.
Stitch count: 12
Rounds 3–4
Work 12 sc around each round.
Stitch count per round: 12
Add the White Hand Section
Change to white yarn during the final stitch of Round 4.
Round 5
Work 12 sc in white.
Stitch count: 12
Make sure the work is oriented correctly and keep the yarn tails toward the inside or back.
Return to Brown
Change back to brown yarn during the final stitch of Round 5.
Rounds 6–12
Work 12 sc around each round.
Stitch count per round: 12
Before the final shaping round, turn the arm inside out enough to weave in the initial and color-change tails.
Close the Arms
Round 13
Work:
- 4 sc
- 1 decrease
Repeat 2 times.
Stitch count: 10
Fasten off and leave a long yarn tail for attaching the arm to the body.
The construction does not call for heavy stuffing. Add only a small amount of fiberfill so the arms remain flexible enough to lie naturally against the body.
Crochet the Christmas Hat
The Christmas hat is worked separately.
The supplied tutorial provides the beginning and ending construction of the hat, but the individual instructions for Rounds 3–23 are not preserved in the transcript.
Because those intermediate instructions are missing, they should not be reconstructed or replaced with another hat pattern.
Round 1
Make a magic circle and work 6 sc.
Round 2
Alternate:
- 1 sc
- 1 inc
Repeat around.
Stitch count: 9
Rounds 3–23
Follow the original on-screen pattern from the tutorial.
The individual stitch instructions for these rounds are not present in the supplied transcript, so no replacement sequence is added here.
Round 24
Work:
- 6 sc
- 1 inc
Stop before the final stitch of the round as instructed in the transcript.
Round 25 — White
Complete the final increase by changing to white during the final stitch.
Then work 48 sc in white.
The transcript describes two white rounds at the hat edge before fastening off.
Fasten off and weave in the red, white, and center starting yarn tails.
Because this is worked in continuous rounds, a small jog or dent at a color change can occur and does not necessarily indicate an error.
Fold the Christmas Hat
If the finished hat stands too stiffly instead of folding over, use the remaining initial yarn tail to help create the bent shape.
- Secure the magic-circle area.
- Bring the yarn toward the outside.
- Fold the top of the hat over.
- Stitch the fold into place.
This creates the folded appearance demonstrated in the tutorial.
Crochet the Candy Cane
The candy cane uses a crocheted striped construction with red and white sections.
Beginning
Make a magic circle and work 6 sc.
Close the magic circle.
Round 2
Alternate:
- 1 sc
- 1 inc
Repeat around.
Stitch count: 9
Add the Candy Cane Stripes
Change to white during the final stitch of Round 2.
Rounds 3–4
Work 9 sc in white.
Rounds 5–6
Change to red and work 9 sc in red.
Rounds 7–8
Change to white and work 9 sc in white.
Rounds 9–10
Change to red and work 9 sc in red.
Keep the unused color toward the back or inside of the work. When the white yarn will be used again for the next stripe, it can be carried rather than fastened off between stripe sections.
Shape the Candy Cane Bend
Rounds 11–12
Change to white.
Work:
- 2 sl st
- 5 hdc
- 2 sl st
Repeat the shaping sequence for the next row as demonstrated.
Rounds 13–14
Change to red.
Work:
- 2 sl st
- 5 hdc
- 2 sl st
Repeat for two rows.
Rounds 15–16
Change to white and work 9 sc around each row.
Final Red Shaping
Change back to red.
Work:
- 1 sc
- 1 decrease
Continue around.
Trim or weave in the white yarn before the final closure if necessary.
Final Row
Work 3 decreases.
Close the remaining opening using an invisible close, then weave the yarn tail through the candy cane to secure it.
Pulling the internal yarn tail through the candy cane can also help create a rounded end.
Assemble the Gingerbread Man
Once the separate components are finished, attach them to the main body.
Attach the Arms
Thread the long yarn tail from an arm onto a tapestry needle.
Position the arm against the body, keeping the visible jog in the stripe toward the back or downward side where possible.
Sew the arm securely to the body, then repeat with the second arm.
The arms should remain flexible rather than becoming rigid.
Attach the Christmas Hat
The Christmas hat may remain removable or be sewn onto the head.
If you choose to sew it on, position it securely and use matching yarn. Stitch through the hat and head without creating large visible stitches.
Attach the Hat Pom-Pom
The supplied kit includes a small pom-pom. The tutorial does not identify a dedicated attachment loop.
The documented options include sewing it with a separate sewing needle and thread or using another suitable attachment method.
The tutor notes that the supplied tapestry needle may be too blunt for easily passing through the pom-pom.
Add Optional Cheeks
Rosy cheeks can be embroidered using pink yarn.
The tutorial demonstrates cheeks as an optional detail but removes them from the demonstrated finished piece. Therefore, cheeks are optional rather than part of the fixed core design.
Attach the Candy Cane
Use the candy cane’s remaining yarn tail if available, or a small amount of compatible leftover yarn.
Secure the candy cane to one arm and make sure the attachment is firm enough for the intended decorative use.
Secure the Yarn Tails
Before considering the gingerbread man finished, make sure all loose yarn tails are safely secured inside the piece.
Pay particular attention to:
- Initial magic-circle tails
- White color-change tails
- Black face-embroidery tails
- Button tails
- Bow-tie tails
- Arm tails
- Hat tails
- Candy-cane tails
For each internal tail:
- Thread it onto a tapestry needle.
- Work it through several stitches.
- Change direction where practical.
- Pull it securely.
- Trim the excess only after it is anchored.
- Tuck the remaining tail inside the piece.
Face-embroidery tails deserve particular attention because they are subject to movement and handling.
Common Mistakes to Avoid
Using the Wrong Hook Size
The tutorial states that the kit hook is incorrectly labeled. Use the demonstrated 2.5 mm hook rather than relying on the incorrect kit labeling.
Losing Track of the First Stitch
This project uses continuous rounds, so mark the first stitch of every round.
Misreading Color Changes
Change colors during the final stitch of the previous color so the transition is completed cleanly.
Turning the Work the Wrong Way
Keep the initial yarn tail inside the piece and make sure the working yarn and loose tails are positioned correctly before continuing.
Overstuffing
Do not overstuff the body before continuing into the head, and do not heavily stuff the arms.
Embroidering the Face Too Late
The face can be embroidered later, but access becomes more difficult once the head is completely closed and stuffed.
Leaving White Yarn Tails Unsecured
Secure the white color-change tails carefully and keep them inside the piece so they do not become visible through the front.
Leaving Button Tails Loose
Sew the buttons flat against the body and securely knot and tuck their tails inside.
Losing the Candy Cane Shape
The candy cane uses a specific curved construction with slip stitches and half double crochet sections. Following that shaping sequence helps create the intended bend.
Construction Sequence
The complete project follows this order:
Magic Circle → Leg 1 → White Leg Accent → Brown Leg Finish → Secure Tails → Leg 2 → White Accent → Keep Working Yarn Active → Join Legs → Torso → Decrease Torso → Prepare Buttons → Prepare Bow Tie → Attach Accessories → Begin Stuffing → Expand Head → Embroider Face → Decrease Head → Stuff Head → Close Head → Make Arms → Lightly Fill Arms → Make Hat → Make Candy Cane → Attach Arms → Attach Hat → Attach Pom-Pom → Attach Candy Cane → Secure All Yarn Tails.
Gingerbread Man Crochet Pattern Logic
The main body follows a simple amigurumi structure:
Legs → Join → Torso → Head Expansion → Head Decrease → Closure
Each leg begins narrow, the two legs are joined into a wider torso, and the torso gradually decreases. The head then expands from the top of the torso before narrowing again toward the final closure.
The arms, buttons, bow tie, Christmas hat, and candy cane are separate components that are completed independently and attached during assembly.
The white crocheted sections are integrated into the construction as decorative icing details rather than being treated as separate sewn pieces.
Final Pattern Note
The supplied tutorial transcript is the primary truth source for the actual crochet construction. Supporting source material can add compatible information about materials, decorative ideas, finishing, storage, handling, and general amigurumi guidance, but it should not replace the transcript-supported stitch counts, round sequence, color changes, construction order, stuffing sequence, or project-specific instructions.
No unsupported finished measurement, stitch count, round sequence, or construction detail should be added to this pattern.