Crochet Christmas Stockings Free Pattern
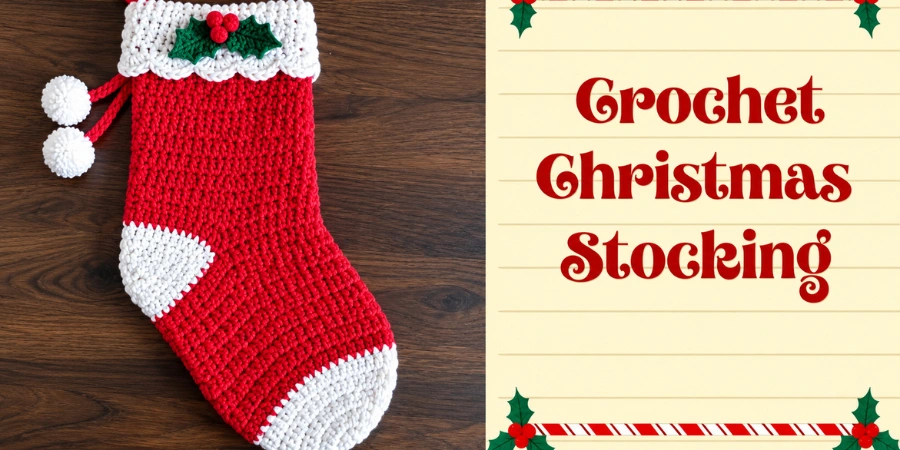
A crochet Christmas stocking brings together a familiar holiday shape with the texture and character of crochet. This Christmas stocking uses separate sections that come together to create a classic holiday stocking shape, with a white toe and heel, a red foot and upper stocking, and a folded white cuff.
The difference comes from how each section connects its yarn, crochet hook, stitch technique, shaping, and finishing details. The demonstrated stocking uses two strands of yarn held together for a thick, chunky construction, with double crochet used through the toe, foot, and upper stocking, while the heel is shaped separately with single crochet decreases and increases.
Crochet Christmas Stockings Free Pattern – the short answer?
Crochet Christmas Stocking Pattern
The Christmas stocking has a classic stocking shape with a fold-over cuff. Its construction begins with the toe and gradually builds the stocking body before the separately constructed heel is added and reconnected to the main body.
The stocking uses white yarn for the toe and heel, while red yarn forms the foot and upper stocking. The cuff is worked separately in white and folded over afterward. The demonstrated version uses two strands of yarn held together, although the hanging loop is worked separately with one strand.
Yarn, Hook, and Finished Size
The demonstrated construction uses two strands of yarn together because the yarn is thin and a thicker, chunkier stocking is desired.
- Red yarn — 2 balls when using the demonstrated two-strand setup
- White yarn — 2 balls when using the demonstrated two-strand setup
- Small amount of green yarn for the optional holly applique
- 6 mm crochet hook for the two-strand construction
- 4 mm crochet hook for the one-strand hanging loop
- Yarn needle
- Scissors
- Optional pom-pom maker
The transcript gives the following measurements for the demonstrated construction:
- Foot section: approximately 5 inches long
- Foot width: approximately 6.5 inches across
- Upper stocking section: approximately 7.5 inches long
- Hanging loop: approximately 4 inches long
- Optional decorative tassel cord: approximately 10 inches long
The upper stocking section may be made longer if desired. Because the cuff overlaps the upper portion, the 7.5-inch measurement refers to the demonstrated upper section rather than an independently invented overall finished stocking measurement.
Crochet Stitches and Abbreviations
The Christmas stocking uses standard crochet terminology:
- CH — Chain
- SL ST — Slip Stitch
- SC — Single Crochet
- SC2TOG — Single Crochet Two Together
- DC — Double Crochet
- FO — Fasten Off
The main stocking sections use double crochet, while the heel is shaped with single crochet and SC2TOG decreases. The cuff also returns to double crochet before the scalloped edge is worked.
The pattern also includes specific joining and construction details. The beginning chain 2 used for the toe does not count as a stitch, and the joining slip stitch should be worked into the first actual double crochet rather than the beginning chain.
During Round 2, an apparent extra stitch may be visible because of the previous slip-stitch join. This is a false stitch and should not be worked into.
Christmas Stocking Construction
The construction of this stocking should be followed in its actual pattern order:
Toe → Foot → Heel → Rejoining the Heel → Upper Stocking → Cuff → Hanging Loop
This order matters because the heel is not worked directly as part of the main body. The toe and foot are completed first, the separate heel is shaped afterward, and then the heel is reconnected to the red stocking body.
Toe in White Yarn
The toe begins with white yarn using two strands held together and a 6 mm crochet hook.
Begin with a Magic Circle.
- Round 1: 10 DC — 10 stitches
- Round 2: 2 DC in every stitch — 20 stitches
- Round 3: 1 DC in the same stitch, 2 DC in the next — 30 stitches
- Round 4: 1 DC in the next 2 stitches, 2 DC in the following stitch — 40 stitches
- Round 5: DC around — 40 stitches
The color changes to red after Round 5. The toe therefore builds gradually from 10 stitches to 40 stitches before the straight section begins.
Foot in Red Yarn
The red yarn is attached to Round 5 with a slip stitch.
Round 6 is worked in DC around, keeping the count at 40 stitches.
The foot continues with:
- Round 6: DC around — 40 stitches
- Rounds 7–14: Repeat Round 6 — 40 stitches
At the end of Round 14, the demonstrated foot measures approximately 5 inches in length and 6.5 inches across.
The red yarn is not fastened off because it will be used again after the heel has been completed.
Heel in White Yarn
The heel is then worked separately in white yarn. The yarn is attached to the 11th stitch of Round 14 after skipping the first 10 stitches.
The heel begins with 20 stitches and is shaped with decreases:
- Row 1: 20 stitches
- Row 2: 18 stitches
- Rows 3–8: Continue the decrease until 6 stitches remain
- Row 9: Increase to 8 stitches
- Rows 10–15: Continue increasing until 20 stitches are reached
The heel is then folded in half and sewn along both sides with a whip stitch. After both sides are sewn, the heel is turned right side out.
This is a shaping section, so the changing stitch counts belong specifically to the heel. They should not be mixed with the 40-stitch body rounds.
Reconnecting the Heel to the Body
Once the heel is finished, the pattern returns to the red yarn that was left attached to the main stocking.
The first round after the heel reconnects the heel to the body while also reducing the possibility of a large gap at the heel joins.
Round 15 begins with chain 2 and continues around the stocking. The body stitches and heel stitches are combined at both heel transitions, with the completed round returning the stocking to its established:
40-stitch circumference
These combined stitches are important because they help prevent a large opening between the heel and the main body.
Upper Stocking
The body then continues with:
- Rounds 16–28: DC around — 40 stitches
The 40-stitch count is maintained throughout this section, with each round joined using a slip stitch.
At the end of Round 28, the upper section measures approximately 7.5 inches. The transcript notes that this section may be made longer if desired, while keeping in mind that the cuff will overlap the top of this section.
Fasten off the red yarn, leaving a sufficiently long tail for weaving in.
Fold-Over White Cuff
The cuff is worked in white yarn from the inside of the stocking toward the outside into a stitch of Round 28.
The cuff begins with chain 2 followed by double crochet around.
A total of 4 rounds of double crochet are worked around the top of the stocking.
The cuff stitches are intentionally worked in the opposite direction from the preceding rounds. This allows the cuff to be folded over so that the intended side of the stitches faces outward.
The cuff therefore has its own construction method and should not be confused with the shaping used for the heel.
Scalloped Cuff Edge
After completing the four cuff rounds, the decorative scalloped edge is created.
- Skip the next stitch.
- Work 5 DC into the following stitch.
- Skip the next stitch.
- Slip stitch into the next stitch.
- Repeat this sequence around the cuff.
At the end, slip stitch into the first double crochet of the previous round to join.
Chain 1 and fasten off. Weave in the remaining end and fold the cuff over.
The basic stocking is now complete.
Hanging Loop
The finished stocking can be given a hanging loop using one strand of yarn and a 4 mm crochet hook.
The demonstrated loop begins with a slip knot and chain 3. The remaining construction uses an I-cord technique until the cord reaches approximately 4 inches.
To finish, yarn over and pull through all three loops, then chain 1 and fasten off.
Attach the loop to a corner of the stocking with a secure knot, or sew it into place.
Optional Tassel
For the optional tassel decoration, make another I-cord approximately 10 inches long.
The demonstration uses two small pom-poms, one at each end of the cord. Pass the cord underneath a corner stitch and attach a pom-pom to each end.
Secure the pom-poms with simple knots and trim the yarn tails to match the surrounding pom-pom fibers. A pom-pom maker may be used, although a fork can also be used to create small pom-poms.
The tassel is an optional finishing detail and is not part of the core stocking construction.
Optional Holly Applique
A small amount of green yarn may be used to decorate the cuff with a holly applique.
The applique is an optional accessory rather than part of the core stocking construction. Its detailed stitch instructions are not included in the supplied transcript, so no additional stitch sequence or measurements have been added.
How the Christmas Stocking Sections Differ
Although the stocking is made from several connected sections, each section creates a different part of the finished shape and should not be mixed with another section.
- Toe: begins with a Magic Circle and increases from 10 to 40 stitches.
- Foot: continues in red yarn and maintains 40 stitches through Round 14.
- Heel: is worked separately in white yarn, decreases from 20 to 6 stitches, and then increases back to 20 stitches.
- Rejoining section: reconnects the heel to the red body and returns the stocking to 40 stitches.
- Upper stocking: continues in DC through Round 28 with 40 stitches per round.
- Cuff: uses four rounds of DC before the scalloped edge is added.
- Finishing: includes the hanging loop and optional tassel, pom-poms, and holly applique.
The same principle applies to the materials. A crochet hook should be connected to the yarn and the section where it is actually used. A round or row should stay with the construction section it creates. A stitch count should appear with the round or row that produces it. This keeps the pattern readable and prevents unrelated instructions from becoming mixed together.
That structure is what makes a crochet Christmas stocking free pattern easy to understand: the reader can see not only what stitch to use, but also where, why, and what part of the stocking that stitch is building.