Amigurumi Christmas Gnome Crochet Pattern
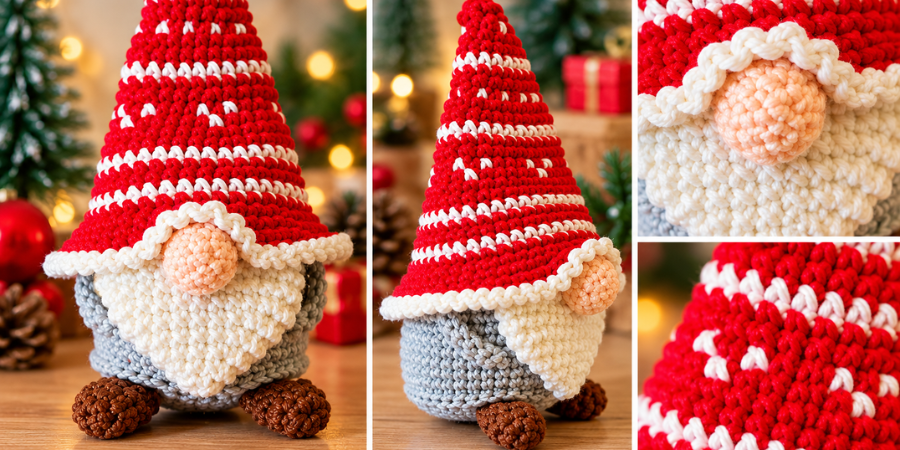
Bring a little handmade charm to your holiday decorating with this cozy Amigurumi Christmas Gnome Crochet Pattern. This cheerful gnome features a rounded silver-gray body, a soft white beard, a cream-colored nose, small arms, chocolate-brown feet, and a tall red-and-white striped hat.
The gnome is made in separate pieces and assembled at the end, making each part easy to work through one step at a time. Along the way, you’ll practice basic amigurumi shaping, increases and decreases, color changes, back-loop and front-loop stitches, stuffing, and simple sewing.
Amigurumi Christmas Gnome Crochet Pattern-the final answer?
Materials
Yarn
Use worsted-weight yarn in the following colors:
- Silver-gray for the body
- White for the beard and hat brim
- Cream or powder for the nose
- Chocolate brown for the feet
- Red for the hat
- White for the hat
- Yarn for the arms
The amount of yarn needed can vary depending on your tension and yarn choice, so no specific yardage is required.
Crochet Hook and Supplies
- 4 mm crochet hook
- Fiberfill stuffing
- Tapestry or yarn needle
- Stitch marker
- Scissors
Crochet Abbreviations
- MR — Magic ring
- sc — Single crochet
- inc — Increase
- dec — Decrease
- sl st — Slip stitch
- ch — Chain
- BL — Back loop
- FL — Front loop
- st(s) — Stitch(es)
- rnd — Round
Before You Begin
This gnome is worked mainly in single crochet using continuous rounds. Keep track of the beginning of each round with a stitch marker, especially while shaping the body and hat.
The finished size can vary with yarn, hook size, and crochet tension.
Gnome Body
The body is worked from the bottom upward with silver-gray yarn. It begins with a small magic ring, expands gradually, stays at its widest point through the middle section, and then decreases toward the top.
Round 1
Work 6 sc in MR.
Stitch count: 6
Round 2
Increase in every stitch around.
Stitch count: 12
Round 3
Repeat:
(sc in next st, inc in next st) × 6
Stitch count: 18
Round 4
Repeat:
(sc in next 2 sts, inc in next st) × 6
Stitch count: 24
Round 5
Sc in every stitch around.
Stitch count: 30
Round 6
Sc in every stitch around.
Stitch count: 36
Round 7
Sc in every stitch around.
Stitch count: 36
Round 8
Sc in every stitch around.
Stitch count: 36
Round 9
Sc in every stitch around.
Stitch count: 36
Round 10
Repeat:
(sc in next 5 sts, inc in next st) × 6
Stitch count: 42
Rounds 11–20
Sc in every stitch around.
Stitch count: 42 each round
Move the stitch marker at the beginning of each round as you work.
Round 21 — Back Loop Only
Work through the back loops only around.
sc in BL around
Stitch count: 42
The front loops left unworked in this round will be used later to finish the lower edge.
Round 22
Repeat:
(sc in next 5 sts, dec) × 6
Stitch count: 36
Round 23
Repeat:
(sc in next 4 sts, dec) × 6
Stitch count: 30
Round 24
Repeat:
(sc in next 3 sts, dec) × 6
Stitch count: 24
Round 25
Repeat:
(sc in next 2 sts, dec) × 6
Stitch count: 18
Stuff the Body
Add fiberfill through the opening before continuing with the final rounds.
Stuff the body firmly enough to hold its shape, but avoid overfilling it. The lower section needs to remain flat and stable.
Round 26
Repeat:
(sc in next st, dec) × 6
Stitch count: 12
Round 27
Decrease in every stitch around.
Stitch count: 6
Fasten off, leaving a sewing tail. Thread the tail onto a yarn needle, work through the front loops of the remaining stitches, and gently pull to close the opening. Secure the yarn and weave the tail into the body.
Lower Edge Detail
The front loops left from Round 21 create a neat lower edge.
Attach the silver-gray yarn near the small jog created by the spiral construction. Work one slip stitch through each exposed front loop around the body. Join with one additional slip stitch, fasten off, and weave in the ends.
Crochet Beard
The beard is worked separately in white yarn and sewn to the front of the body.
Round 1
Work:
6 sc in MR
Stitch count: 6
Round 2
Repeat:
(sc in next 2 sts, inc) × 2
Stitch count: 8
Round 3
Begin with an increase, then work:
- sc in next 2 sts
- 2 increases
- sc in next 2 sts
- 1 increase
Stitch count: 12
Round 4
Begin with an increase, then work:
- sc in next 4 sts
- 2 increases
- sc in next 4 sts
- 1 increase
Stitch count: 16
Round 5
Begin with an increase, then work:
- sc in next 6 sts
- 2 increases
- sc in next 6 sts
- 1 increase
Stitch count: 20
Round 6
Begin with an increase, then work:
- sc in next 8 sts
- 2 increases
- sc in next 8 sts
- 1 increase
Stitch count: 24
Rounds 7–9
Sc in every stitch around.
Stitch count: 24 each round
Round 10
Work:
- 1 decrease
- sc in next 8 sts
- 2 decreases
- sc in next 8 sts
- 1 decrease
Stitch count: 20
Fasten off with a long sewing tail.
Do not add stuffing to the beard. Flatten it and sew the top edge closed, keeping both layers together.
Attach the Beard
Locate the body spiral and use the jog as a guide for the back of the gnome. Count down to Round 10 and position the beard along this round.
Sew the top edge of the beard securely to the body. The lower portion can remain free so the beard has some natural movement.
Crochet Nose
Use cream or powder-colored yarn for the nose.
Round 1
Work:
5 sc in MR
Stitch count: 5
Round 2
Increase in every stitch.
Stitch count: 10
Round 3
Sc in every stitch around.
Stitch count: 10
Round 4
Work:
5 dec
Stitch count: 5
Fasten off with a sewing tail.
Attach the Nose
Position the nose in the center of the beard.
Sew around the edge of the nose, catching the beard underneath as you work. Continue around the entire edge, secure the yarn, and weave the remaining tail into the beard and body.
Crochet Arms
Make 2 arms.
Each arm is made with a chain and slip stitches.
Arm
Chain 10.
Starting in the second chain from the hook, slip stitch down the chain.
The loop already on the hook does not count as a chain stitch.
Fasten off and leave a sewing tail. Make the second arm in the same way.
Attach the Arms
Position the arms along the sides of the body around Round 10.
Keep them alongside the beard, approximately four stitches away from the beard on each side.
Sew the arms securely to the body, then weave in the yarn tails and trim the excess.
Crochet Feet
Make 2 feet using chocolate-brown yarn.
Round 1
Work:
6 sc in MR
Stitch count: 6
Round 2
Repeat:
(sc in next st, inc) × 3
Stitch count: 9
Round 3
Sc in every stitch around.
Stitch count: 9
Round 4
Repeat:
(sc in next st, dec) × 3
Stitch count: 6
Fasten off with a sewing tail.
Close the Feet
Fold each foot closed and sew across the top edge, joining the two layers.
Make the second foot in the same way.
Attach the Feet
Position the feet along the front of the body around Round 21.
They should sit underneath the lower section of the body.
Sew each foot securely into place, weave in the yarn tails, and trim the excess.
Striped Christmas Hat
The Christmas hat is worked separately in red and white yarn. Its gradual increases create the tall cone, while the color changes give it a festive striped appearance.
When changing colors within a single crochet, complete the final pull-through of the stitch with the new color.
Hat Round 1
Work:
6 sc in MR
Stitch count: 6
Hat Round 2
Sc in every stitch around.
Stitch count: 6
Hat Round 3
Increase in every stitch.
Stitch count: 12
Hat Round 4
Work:
- 3 red sc
- 1 white sc
- 3 red sc
- 1 white sc
- 3 red sc
- 1 white sc
Stitch count: 12
Hat Round 5
Sc in every stitch around in red.
Stitch count: 12
Hat Round 6
Repeat:
(sc in next 2 sts, inc) × 4
Stitch count: 16
Finish the final increase in white.
Hat Round 7
Sc in every stitch around in white.
Stitch count: 16
Finish the final stitch in red.
Hat Round 8
Sc in every stitch around in red.
Stitch count: 16
Hat Round 9
Repeat:
(sc in next 3 sts, inc) × 4
Stitch count: 20
Hat Round 10
Work alternating red and white single crochet stitches around.
Stitch count: 20
Finish the final white stitch with red.
Hat Round 11
Repeat:
(sc in next 4 sts, inc) × 4
Stitch count: 24
Hat Round 12
Sc in every stitch around in red.
Stitch count: 24
Finish the final stitch in white.
Hat Round 13
Sc in every stitch around in white.
Stitch count: 24
Finish the final stitch in red.
Hat Round 14
Sc in every stitch around in red.
Stitch count: 24
Hat Round 15
Repeat:
(sc in next 3 sts, inc) × 6
Stitch count: 30
Finish the final increase in white.
Hat Round 16
Work:
- 1 white sc
- 1 red sc
- 1 white sc
- 3 red sc
Repeat the color sequence around.
Stitch count: 30
Hat Round 17
Begin with the red-to-white transition, then work:
- 1 white sc
- 5 red sc
Repeat around.
Stitch count: 30
Hat Round 18
Repeat:
(sc in next 4 sts, inc) × 6
Stitch count: 36
Hat Round 19
Sc in every stitch around in red.
Stitch count: 36
Finish the final stitch in white.
Hat Round 20
Sc in every stitch around in white.
Stitch count: 36
Finish the final stitch in red.
Hat Round 21
Sc in every stitch around in red.
Stitch count: 36
Hat Round 22
Repeat:
(sc in next 5 sts, inc) × 6
Stitch count: 42
Finish the final increase in white.
Hat Round 23
Sc in every stitch around in white.
Stitch count: 42
Finish the final stitch in red.
Hat Round 24
Sc in every stitch around in red.
Stitch count: 42
Hat Round 25 — Front Loop Only
Work through the front loops only.
Repeat:
(sc in next 6 FL, front-loop inc) × 6
Stitch count: 48
This round creates the foundation for the white brim.
Hat Round 26
Return to working through both loops.
Begin with:
sc in next 3 sts, inc
Then continue the established sequence:
(sc in next 7 sts, inc)
Continue for the required repetitions, finishing with the final four single crochet stitches.
Stitch count: 54
Hat Round 27
Repeat:
(sc in next 8 sts, inc) × 6
Stitch count: 54
Finish the final increase in white. Cut the red yarn and continue with white.
Hat Round 28 — White Brim
Chain 1.
Then repeat around:
ch 1, sl st to next stitch
Continue around all 54 positions.
Fasten off with a long sewing tail.
The white edging forms the finished brim.
Finish the Hat
Weave in the remaining red tail.
Add a small amount of fiberfill inside the hat to help it hold its shape. Avoid overstuffing so the hat remains soft and naturally conical.
Final Assembly
Once all the individual pieces are finished, it is time to bring the gnome together.
1. Check the Placement
Before attaching the hat, make sure:
- The beard is centered.
- The nose is centered on the beard.
- The arms sit around Round 10.
- The feet sit around Round 21.
- The body is securely stuffed.
- The gnome sits steadily on its feet.
2. Position the Hat
Place the hat over the top of the body.
The white brim should sit over the upper beard area and cover the area where the beard and nose meet the body.
Begin sewing from the back.
3. Sew the Hat in Place
Thread the long white hat tail onto the tapestry needle.
Sew through the white brim while catching the body fabric underneath. Continue around the hat.
At the front, work the needle underneath the white brim and through the upper part of the beard. Catch the brim again and continue around the nose and beard area.
The brim should sit neatly over the facial attachment area.
Continue sewing until the hat is securely attached to the body.
Tie off the yarn within the brim, weave the remaining tail into the body, and trim the excess.
Finishing Touches
Take a moment to check the entire gnome before calling the project finished.
Make sure the body is securely closed, the beard and nose are centered, the arms and feet are firmly attached, and the hat sits comfortably over the top of the body.
Weave in any remaining yarn tails and trim away excess ends.
The finished gnome has a soft rounded body, a fluffy-looking crocheted beard, a small nose, little arms and feet, and a festive striped hat that gives the project its Christmas character.
Christmas Decorating Ideas
This crochet Christmas gnome makes a lovely addition to seasonal decorating.
Place it on a shelf, mantel, side table, coffee table, or Christmas display. It can also be grouped with other handmade decorations to create a warm, cozy holiday arrangement.
Because the project is made from separate pieces, there is also plenty of room for personal touches. You can experiment with compatible yarn colors or subtle embroidery details to create a Christmas gnome that fits your own decorating style.
Handmade Christmas Gifts
A handmade gnome can also make a thoughtful Christmas gift.
Crocheted decorations are small enough to give as individual presents, add to a holiday gift basket, or use as part of a larger handmade Christmas collection.
A Fun Crochet Project
This project is also a useful way to practice several amigurumi techniques in one piece.
You’ll work with:
- Magic rings
- Single crochet
- Increases
- Decreases
- Back-loop-only stitches
- Front-loop-only stitches
- Color changes
- Crocheted separate pieces
- Stuffing
- Sewing and assembly
Once the individual sections are complete, they come together to create one cheerful handmade Christmas character.
Final Thoughts
This Amigurumi Christmas Gnome Crochet Pattern combines simple crochet stitches with shaping, color changes, and straightforward assembly to create a charming holiday decoration.
The rounded body, white beard, small nose, little feet, and tall striped hat each contribute to the character of the finished gnome. Whether you make one for your own Christmas décor or create several as handmade gifts, it is a fun project for adding a personal crochet touch to the holiday season.