Free Christmas Bell Crochet Pattern
Handmade Christmas decorations bring a special touch to the holiday season. These Christmas crochet bells are lovely ornaments for decorating Christmas trees, wreaths, garlands, and festive table displays. They also make thoughtful handmade gifts that can be enjoyed year after year.
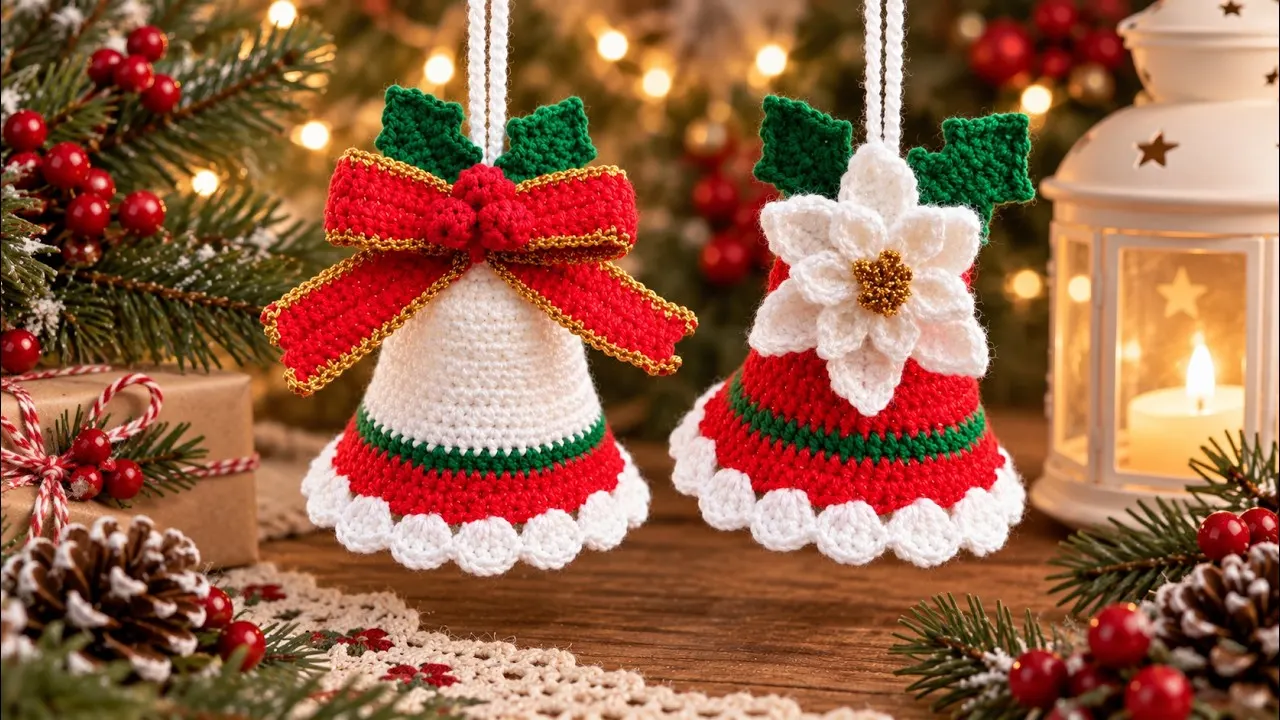
This project includes two beautiful Christmas bell designs. The first is a classic white Christmas bell decorated with a red and gold bow. The second is a festive red Christmas bell decorated with a delicate white poinsettia flower. Both designs share the same main bell construction, while their different colors and decorative elements create two distinct finished ornaments.
The bell body is worked in joined rounds, beginning with a small foundation circle. Half double crochet stitches form the main structure, and gradual increases help widen the bell. Once the base reaches 40 stitches, alternating plain rounds create a cleaner appearance. Color changes and a decorative lower edge add the finishing details to the crochet bell ornament.
Free Christmas Bell Crochet Pattern – The Short Answer?
Materials and Supplies
Gather your supplies before starting the project. Having everything ready will make it easier to follow the rounds and manage the color changes.
- White yarn for the classic Christmas bell.
- Red yarn for the festive Christmas bell.
- Additional coordinating yarn colors for decorative rounds.
- Gold yarn or material for the bow decoration.
- White yarn for the poinsettia flower.
- Crochet hook.
- Yarn needle.
- Scissors.
- Stitch marker.
Choose a crochet hook suitable for your selected yarn. The exact yarn weight, hook size, and quantity can vary depending on the materials you use.
Crochet Abbreviations
The following abbreviations are used throughout the pattern:
- ch – Chain
- sl st – Slip stitch
- hdc – Half double crochet
- dc – Double crochet
- tr – Triple crochet
- inc – Increase (2 HDC in the same stitch)
Before You Begin
Both Christmas bell designs use the same basic bell body. You can make the white version or the red version by choosing the appropriate yarn color.
The construction begins with six chains joined into a circle. Half double crochet stitches are worked into this foundation circle to create the first round. Gradual increases then expand the circular base, taking the stitch count from 12 to 40.
After the base is shaped, the bell sides are worked through alternating rounds. This construction detail is important because repeating the same round pattern throughout this section would create an unsightly visible line on the bell. Alternating the two rounds helps achieve a cleaner finish.
Use a stitch marker to identify the beginning of each round. After joining each round, check that your work is sitting evenly before moving on. Consistent tension also helps the bell maintain a uniform shape.
How to Crochet the Christmas Bell Body
Round 1: Create the Foundation Circle
Start with a slip knot and chain 6.
Join the chain with one slip stitch into the first chain to form a circle.
Work 12 half double crochet stitches into the circle. Place a stitch marker in the first stitch so you can easily identify the beginning of the round.
Join with one slip stitch into the top of the first stitch.
Stitch count: 12 HDC.
Round 2: Increase the Stitch Count
In the same space, work 2 half double crochet stitches to create an increase.
Place your stitch marker in the first stitch of the round.
Continue working 11 additional half double crochet increases around the circle. Each increase consists of two half double crochet stitches worked into the same stitch.
Join with one slip stitch into the top of the first stitch.
Stitch count: 24 HDC.
Round 3: Continue Widening the Base
The third round continues expanding the circular base with half double crochet increases. Begin with one increase followed by two half double crochet stitches, then continue the increase pattern around the circle.
The round finishes with 32 stitches.
Join with one slip stitch into the top of the first stitch.
Stitch count: 32 HDC.
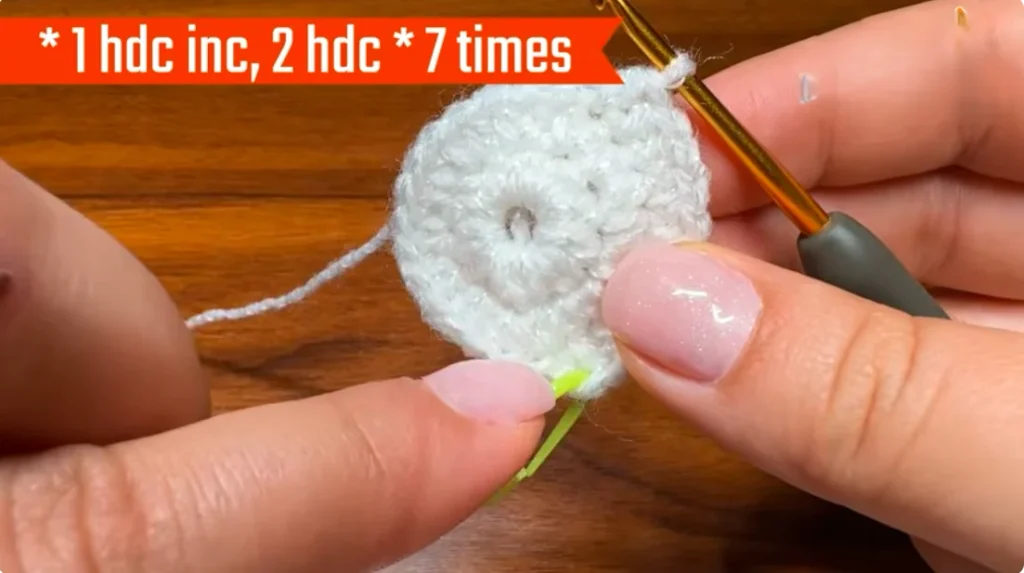
Round 4: Complete the Bell Base
Continue increasing the bell base with half double crochet stitches. Begin with an increase followed by three half double crochet stitches, then continue the increase pattern around the circle.
The round finishes with 40 stitches.
Join with one slip stitch into the top of the first stitch.
Stitch count: 40 HDC.
Working the Bell Sides
Once the base reaches 40 stitches, the next rounds build the sides of the bell without changing the overall stitch count.
The pattern alternates two different round patterns rather than repeating the same construction throughout. This helps prevent a noticeable line from forming along the bell and gives the crochet fabric a cleaner appearance.
Round 5
Chain 2 and count these chains as the first stitch.
In the same space, work one half double crochet stitch. Continue with 38 half double crochet stitches.
Skip the final stitch before joining.
Join with one slip stitch into the top of the first stitch.
Stitch count: 40 stitches.
Round 6
In the same space, work one half double crochet stitch.
Continue with 39 half double crochet stitches around the bell.
Join with one slip stitch into the top of the first stitch.
Stitch count: 40 HDC.
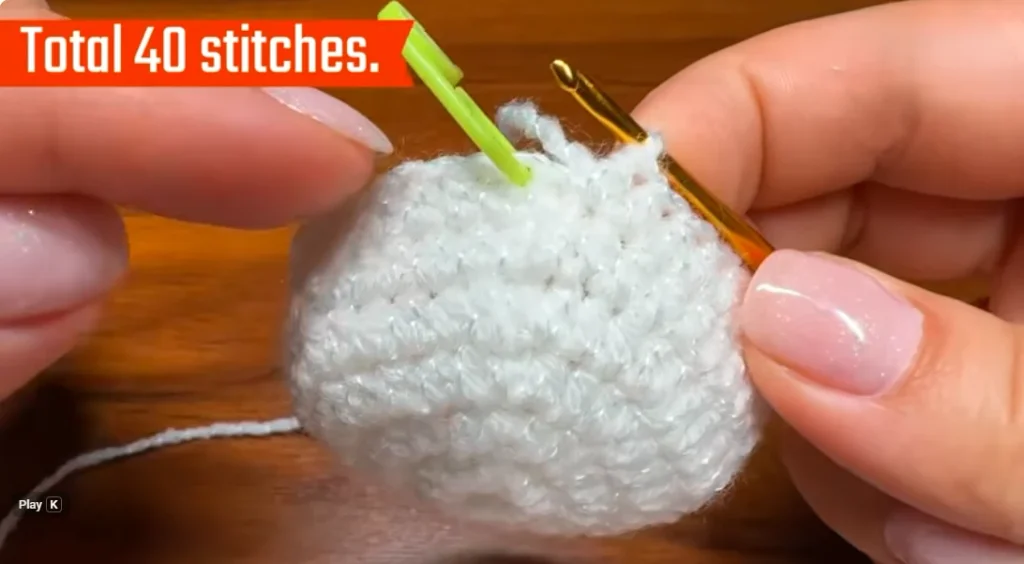
Rounds 7–10: Alternate the Two Rounds
Continue building the bell sides by alternating the previous two rounds:
- Round 7: Repeat Round 5.
- Round 8: Repeat Round 6.
- Round 9: Repeat Round 5.
- Round 10: Repeat Round 6.
Maintain the 40-stitch count throughout these rounds.
Alternating the construction in this way helps avoid an unsightly line and gives the bell a more even appearance. Check the stitch count after each round so the shaping remains consistent.
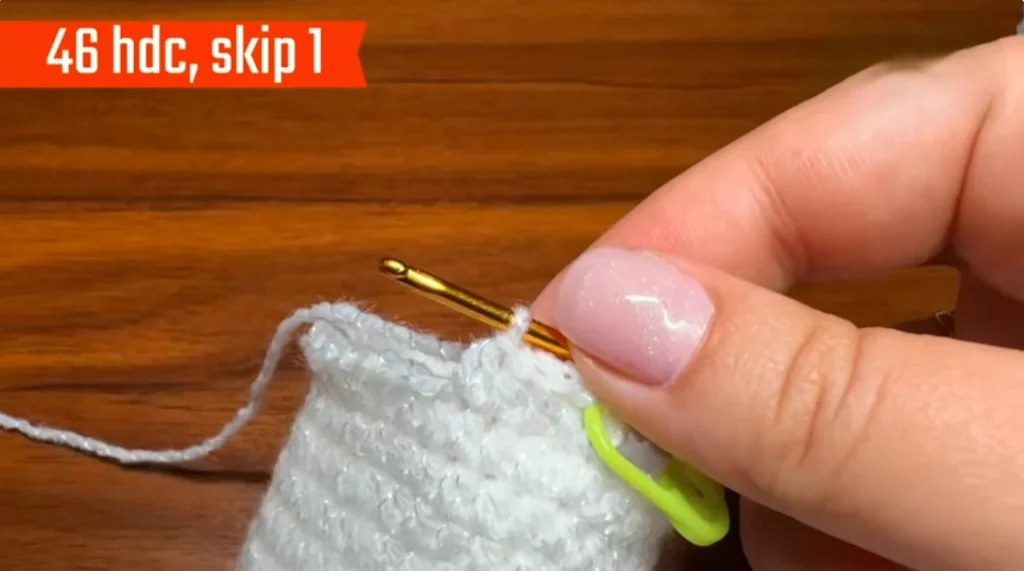
Continue Shaping the Bell
After completing Round 10, the pattern returns to increase rounds to widen the bell. The stitch count gradually increases from 40 to 64, with plain rounds between some of the increases.
Round 11: Increase to 48 Stitches
Work one half double crochet increase followed by four half double crochet stitches. Continue the increase construction around the bell.
Join with one slip stitch into the top of the first stitch.
Stitch count: 48 HDC.
Round 12: Maintain the Stitch Count
Join with one slip stitch into the top of the first stitch.
Chain 2 and count these chains as the first stitch.
In the same space, work one half double crochet stitch. Work 46 half double crochet stitches, then skip the final stitch.
Join with one slip stitch into the top of the first stitch and fasten off.
Stitch count: 48 stitches.
Round 13: Introduce a New Yarn Color
Join the next yarn color in the same space. Work over the yarn tails as you crochet to help hide the loose ends.
Work one half double crochet increase followed by five half double crochet stitches. Continue the increase construction around the bell.
Join with one slip stitch into the top of the first stitch and fasten off.
Stitch count: 56 HDC.
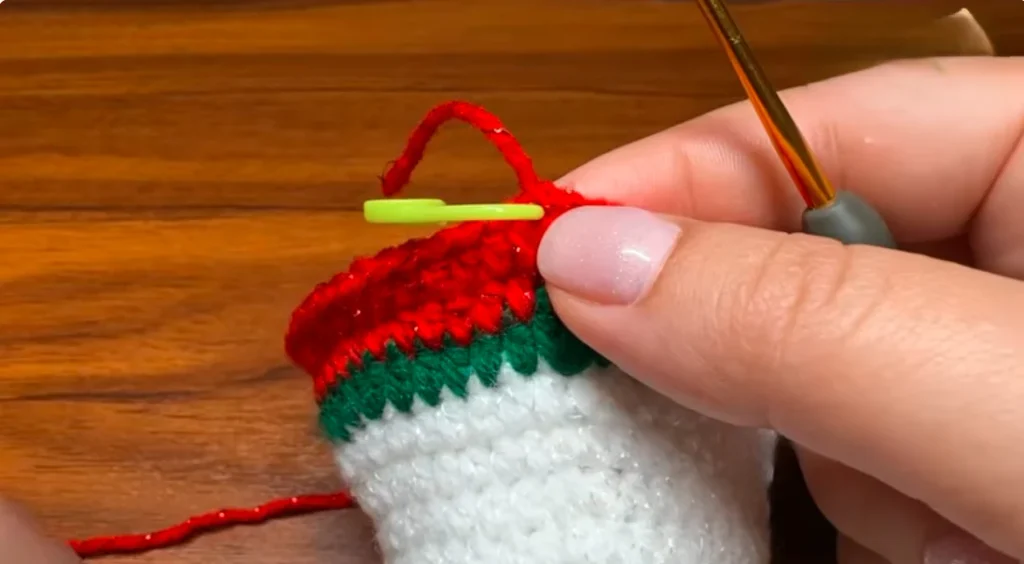
Round 14: Work an Even Round
Join the next yarn color in the same space.
Work over the yarn tails to keep the color transition neat.
Work 56 half double crochet stitches around the bell.
Join with one slip stitch into the top of the first stitch.
Stitch count: 56 HDC.
Round 15: Complete the Bell Shaping
Work one half double crochet increase followed by six half double crochet stitches. Continue the increase construction around the bell.
Join with one slip stitch into the top of the first stitch and fasten off.
Stitch count: 64 HDC.
The increase rounds gradually expand the bell, while the plain rounds maintain the stitch count between increases. The color changes also add decorative layers to the crochet fabric.
Crochet the Decorative Lower Edge
The decorative lower edge gives the bell its finished appearance. This section uses taller stitches to create a textured border.
Join the next yarn color in the same space.
- Chain 3.
- Work three triple crochet stitches into the same space.
- Work one double crochet stitch into the same space.
- Skip three stitches.
- Continue the decorative stitch sequence around the bell.
- Join with one slip stitch into the top of the first stitch.
- Fasten off.
The combination of triple crochet and double crochet creates the decorative edging around the lower part of the bell. The skipped stitches separate the decorative groups and help form the open, scalloped appearance.
Keep the decorative groups evenly spaced as you work around the lower edge.
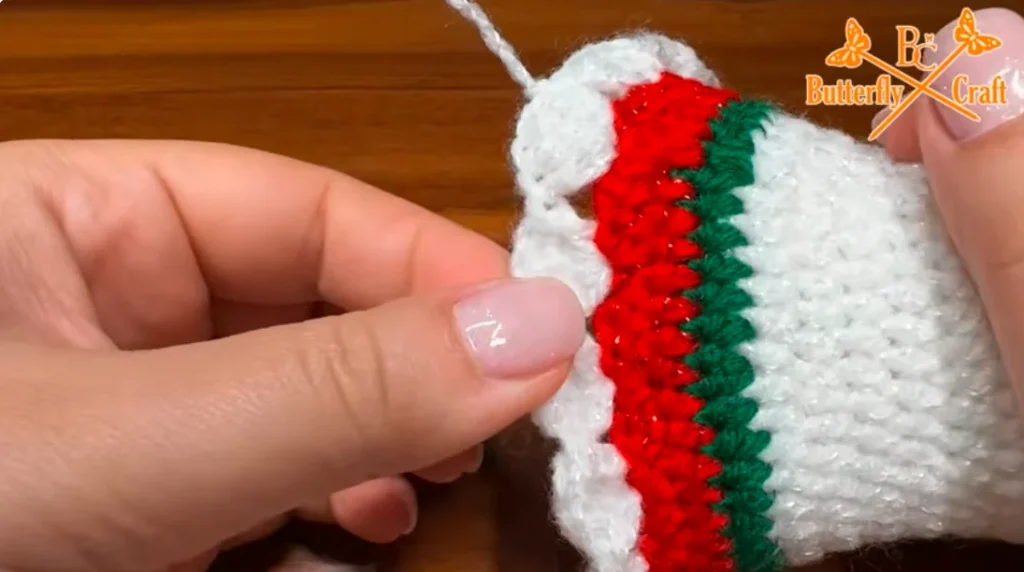
Shape the Bell
After completing the decorative edge, shape the bell carefully with your hands.
Check that the sides sit evenly and that the lower border has a balanced appearance. Adjust the decorative edge gently to create the intended bell silhouette.
Before moving on, check the following:
- The bell body has an even shape.
- The lower decorative edge is arranged neatly.
- The color changes are secure.
- Loose yarn ends have been fastened or woven in.
Make the Hanging Loop
The hanging loop allows you to display the finished ornament on a Christmas tree, wreath, or garland.
Start with a slip knot and chain 60.
Join with one slip stitch into the first chain to form a loop. Then chain another 22 stitches and fasten off.
Position the hanging loop at the top of the bell and secure it neatly so the ornament can hang properly. Check that the loop is centered and firmly attached.
Two Christmas Bell Decoration Ideas
Once the main bell body is complete, you can create either of the two designs.
White Christmas Bell with a Red and Gold Bow
The first design features a white crochet bell decorated with a red and gold bow. The contrasting colors give the ornament a classic Christmas appearance.
The bow can be paired with holly leaves and berries to create an extra festive touch. These decorative details complement the white bell and bring the red and gold colors together.
Red Christmas Bell with a White Poinsettia
The second design uses a red bell body decorated with a delicate white poinsettia flower.
The white flower stands out against the red crochet fabric and adds a traditional seasonal detail. Its petals create a lovely contrast with the textured bell body.
The bow, holly leaves, berries, and poinsettia are separate decorative components. Their detailed stitch instructions are covered in their respective flower and bow tutorials.
Final Assembly and Finishing
After completing the bell body and hanging loop, prepare the decorative details for your chosen design.
- For the white bell, use the red and gold bow design.
- For the red bell, use the white poinsettia flower.
- Add the holly leaves and berries to complement the bow design.
- Secure the decorative elements to the bell.
- Check that the hanging loop and all attached details are firmly in place.
- Weave in any remaining loose yarn ends.
Take a moment to check the finished ornament from all sides. The bow or flower should sit neatly against the bell, and the hanging loop should allow it to hang comfortably.
Ways to Display Your Finished Christmas Bells
These handmade ornaments can be used in several ways around your home during the festive season.
- Hang them from Christmas tree branches.
- Add them to a holiday wreath.
- Use them as decorations on a Christmas garland.
- Display them as part of a festive table arrangement.
- Include them with handmade Christmas gifts.
- Combine both color designs for a coordinated holiday display.
You can also choose coordinating yarn colors to match your existing Christmas decorations.
Common Mistakes to Avoid
Uneven Bell Shape
Inconsistent tension or incorrect increase placement can affect the shape of the bell. Maintain even tension and check the stitch count at the end of each round.
Visible Joining Line
Repeating the same construction throughout Rounds 5–10 can create an unsightly line. Follow the alternating Round 5 and Round 6 sequence to achieve a cleaner appearance.
Incorrect Stitch Count
Missing an increase or working into an additional stitch can change the shape of the bell. Use a stitch marker and check the stated stitch count before moving to the next round.
Untidy Color Changes
Loose yarn tails can make color transitions look untidy. Work over the yarn tails when joining new colors, then secure any remaining ends during finishing.
Uneven Decorative Edge
The decorative lower edge depends on the placement of the triple crochet and double crochet groups. Keep the groups evenly spaced as you work around the bell.
Final Notes
Both Christmas bell designs begin with the same crocheted bell body. The six-chain foundation circle, half double crochet increases, alternating rounds, color changes, and decorative lower edge create the main ornament.
The white bell is decorated with a red and gold bow, while the red bell features a white poinsettia flower. These decorative details give each design its own festive character.
These crochet Christmas bells are a lovely way to create reusable handmade decorations for Christmas trees, wreaths, garlands, holiday displays, and thoughtful handmade gifts.