Octopus Crochet Pattern
If you love making soft and cuddly amigurumi, this octopus crochet pattern is a fun project to add to your collection. It features a rounded plush body, 10 curly tentacles, and a sweet little face decorated with crocheted blush and embroidered details.
The octopus is made with 6 mm plush yarn and a 7 mm crochet hook, giving it a soft texture and a lovely chunky appearance. The body is worked in joined rounds, starting with a magic ring. Once the main shape is complete, the tentacles are attached through the unused front loops of Round 11. A few simple facial details bring the little octopus to life.
Octopus Crochet Pattern – The Final Answer?
Materials Needed
Before getting started, gather your yarn, crochet hook, and a few basic tools. The main body uses plush yarn, while thinner cotton yarn is used for the facial details.
- 6 mm plush yarn for the main body
- 7 mm crochet hook
- 15 mm safety eyes
- 2 mm pink cotton yarn for the blush
- 2 mm black cotton yarn for the mouth
- 6 mm white plush yarn for the eye decoration
- Polyester stuffing
- Yarn needle
- Stitch marker
- Scissors
- Hot glue
Crochet Abbreviations
The pattern uses standard crochet abbreviations. If you are new to amigurumi, keep this list nearby as you work through the rounds.
- MR – Magic Ring
- Ch – Chain
- SC – Single Crochet
- INC – Increase
- DEC – Decrease
- HDC – Half Double Crochet
- Slst – Slip Stitch
- BLO – Back Loop Only
- FLO – Front Loop Only
How to Crochet the Octopus Body
Start the octopus with pink 6 mm plush yarn. The body is worked in joined rounds, with increases creating the rounded upper section and decreases shaping the bottom.
At the end of each round, join with a slip stitch into the first single crochet. Then chain 1 before beginning the next round. Remember that this starting chain does not count as a stitch.

Increasing the Body (Rounds 1–5)
Begin with a magic ring and work the first five rounds according to the instructions below. These increases gradually expand the body until it reaches 36 stitches.
- Round 1: Make a magic ring and crochet 8 SC into the ring. (8)
- Round 2: Make 8 INC. (16)
- Round 3: Repeat (1 SC, 1 INC) 8 times. (24)
- Round 4: Repeat (3 SC, 1 INC) 6 times. (30)
- Round 5: Repeat (4 SC, 1 INC) 6 times. (36)

Working the Straight Rounds (Rounds 6–9)
Now that the body has reached its widest point, continue crocheting without adding or removing stitches. Work 36 single crochet stitches in each round.
- Rounds 6–9: Crochet 36 SC in each round. (36)
Keeping the same stitch count throughout these rounds helps maintain the rounded shape of the octopus body.
Shaping the Lower Body (Rounds 10–12)
Next, begin decreasing the stitches to shape the lower part of the body. Pay attention to Round 11 because it is worked in the back loops only. This leaves the unused front loops available for attaching the curly tentacles later.
- Round 10: Repeat (4 SC, 1 DEC) 6 times. (30)
- Round 11: Work in BLO and repeat (3 SC, 1 DEC) 6 times. (24)
- Round 12: Repeat (2 SC, 1 DEC) 6 times. (18)
Stuffing and Closing the Body (Rounds 13–14)
Before finishing the final rounds, add polyester stuffing to the body. Distribute it evenly so the octopus keeps its rounded shape.
Continue with the last two rounds:
- Round 13: Repeat (1 SC, 1 DEC) 6 times. (12)
- Round 14: Make 6 DEC. (6)
Fasten off and close the remaining opening securely.
How to Crochet the 10 Curly Tentacles
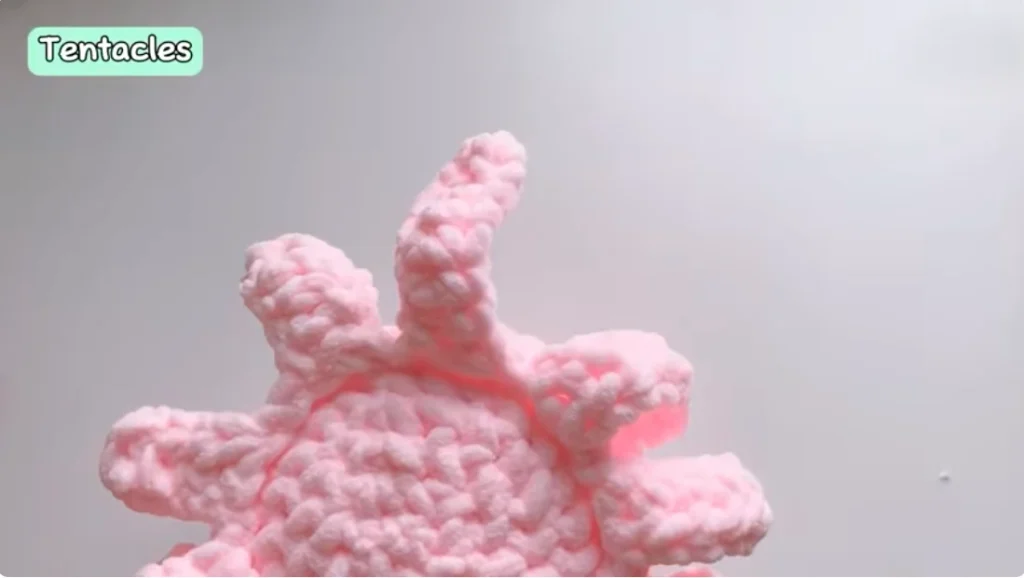
The curly tentacles give this plush octopus its distinctive look. They are attached through the unused front loops of Round 11 and worked using chains and half double crochet stitches.
To make each tentacle, insert your hook into an available front loop from Round 11 and chain 10. Starting in the third chain from the hook, work 1 HDC. Then make 1 HDC in each of the next 7 chains, giving you 8 HDC stitches in total.
Once the curled section is complete, skip 2 stitches on the body and make a slip stitch into the third body stitch to anchor the tentacle.
Repeat this construction until you have made all 10 curly tentacles.
One detail needs checking before following the placement as a complete repeat: the pattern specifies 10 tentacles, but Round 11 has 24 front loops, and the written instructions do not fully explain how all 10 attachment points are distributed. Refer to the original construction demonstration for the exact placement rather than assuming an evenly spaced arrangement.
How to Crochet the Pink Blush Pieces
The little pink cheeks add a sweet finishing detail to the octopus. You will need 2 mm pink cotton yarn to make two small crocheted circles.
Start each piece with a magic ring and chain 2. Work 12 DC into the ring, then close it. Join with a slip stitch into the first DC, chain 1, and cut the yarn. Hide the loose end neatly.
Make two matching blush pieces and keep them ready for attaching beneath the eyes.

Adding the Safety Eyes
Take the two 15 mm safety eyes and position them between Rounds 6 and 7 of the body. Check their placement carefully to make sure they look even before securing them.
The original construction uses a hot glue method to secure the eyes, so follow that placement and method when adding them.

Embroidering the Mouth
Use 2 mm black cotton yarn to embroider the mouth on Round 8. Position it between the eyes and keep the stitches neat to create the simple facial expression.
Decorating Around the Eyes
For the white detail around the eyes, use 6 mm white plush yarn. Add the decoration in the original placement, making sure it frames the eyes without covering them.
Attaching the Blush
Once the facial details are ready, attach the two pink crocheted blush pieces beneath the eyes. Place one on each side of the mouth and secure them neatly.
These small details help give the finished octopus its cute and friendly appearance.
Final Finishing Touches
Take a moment to check your finished octopus. Make sure the body is evenly stuffed, the bottom opening is closed, and all 10 curly tentacles are attached. Check that the safety eyes, embroidered mouth, white eye decoration, and pink blush pieces are secure.

Your plush octopus crochet project is now complete and ready to enjoy.