
Christmas Crochet Pillow Pattern
If you love making festive crochet home décor, this peppermint pillow is a lovely project to add to your Christmas collection. Its spiral design is created with two contrasting yarn colors, giving the finished pillow a classic peppermint-inspired look.
Unlike a pillow made from two separate panels, this design is worked as one continuous piece. You begin with a small center ring, gradually expand the crochet rounds, wrap the growing piece around a round pillow form, and then decrease the stitches to close the opposite side.
The pattern uses double crochet stitches and an interlocking two-color construction. Although the rounds may look complicated at first, the project becomes easier when you understand how the two colors are worked separately and how the connecting chain spaces change as the pillow grows.
Christmas Crochet Pillow Pattern – The Final Answer?
Materials
You will need the following supplies to make the peppermint pillow:
- Yarn: Red Heart Super Saver Cherry Red (0319) – 1 ball, approximately 204 yards (186.5 m)
- Yarn: Red Heart Super Saver Soft White (0316) – 1 ball, approximately 164 yards (150 m)
- Crochet hook: 5.5 mm (US I/9)
- Pillow form: Round pillow form
- Yarn needle
- Scissors
Choose two contrasting colors so the spiral pattern is easy to see. You can use red and white for a traditional peppermint appearance or select another color combination to match your home décor.
The original pattern targets a pillow form approximately 16 inches (40.5 cm) in diameter. A smaller version can be made for an approximately 14-inch pillow by following the shorter round schedule described below.
Crochet Abbreviations
This pattern uses US crochet terminology.
- ch — chain
- dc — double crochet
- dec — decrease
- inc — increase
- rep — repeat
- rnd — round
- sc — single crochet
- sl st — slip stitch
- sp — space
- st(s) — stitch(es)
- tog — together
- yoh — yarn over hook
How the Pillow Is Constructed
The pillow is crocheted as one continuous cover using two colors. Color A and Color B are worked in alternating rounds, with each color maintaining its own stitches and spaces.
The construction has three main stages:
- Center and foundation: Create a chain-4 ring and establish eight double crochet spokes in each color.
- Expansion: Increase the sections gradually while making the connecting chain spaces longer.
- Decreasing and closure: Reduce the stitches and chain spaces, insert the pillow form, and close the remaining opening.
One important detail is to keep the unused yarn accessible. Before moving across to the next section, bring the other color forward so it does not become trapped behind the active yarn.
How to Make the Pillow
Starting Ring
Begin with Color A.
Chain 4 and join with a slip stitch to the first chain to form a ring.
Round 1: Color A
Chain 4. The beginning chain establishes the first double crochet and chain-1 space.
Work 1 dc into the center of the ring, then chain 1.
Continue repeating the double crochet and chain-1 sequence around the ring until you have 8 double crochet spokes.
Join with a slip stitch to the third chain of the beginning chain-4.

Round 2: Color B
Join Color B in the center of the ring, between the first chain and the first double crochet.
Chain 4, then work 1 dc between the next two posts and chain 1.
Continue working 1 dc and chain 1 in each available space until you have 8 double crochet spokes.
Bring the starting yarn tail forward before joining. Join with a slip stitch to the third chain and secure the starting tail through the center.
Rounds 1 and 2 establish the same central diameter in the two colors. Keep the two color sections separate as you continue.
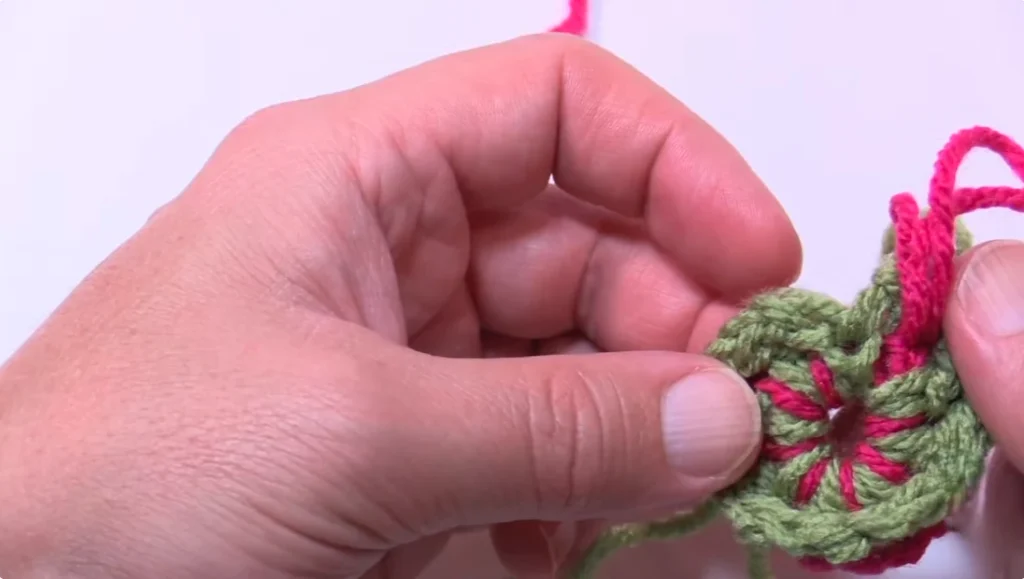
Round 3: Color A
Slip stitch into the next Color A chain-1 space.
Chain 3 and work 1 additional dc into the same space. Bring Color B forward so it remains accessible, then chain 2.
Work 2 dc into the next Color A chain-1 space. Continue around, placing 2 dc in each designated Color A space and chaining 2 between sections.
Join with a slip stitch to the top of the beginning chain 3.
Round 4: Color B
Slip stitch into the first Color B space.
Chain 3 and work 1 additional dc into the same space. Chain 2, then work 2 dc into the next Color B chain-1 space.
Repeat this arrangement around the round. Bring Color A forward before joining, then join with a slip stitch to the beginning chain 3.
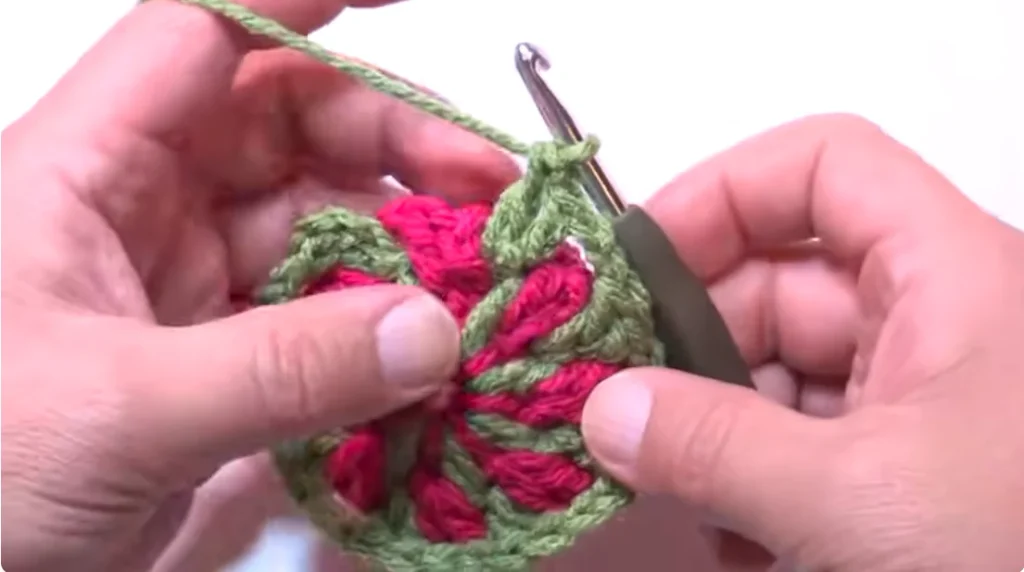
Round 5: Color A
Slip stitch to the next double crochet and chain 3.
Work 2 dc into the next designated chain space. Bring Color B forward and chain 3.
Skip the first available post in the next section and work 1 dc into the second post. Work 2 dc into the next space.
Continue following the same arrangement around the round and join with a slip stitch.
Round 6: Color B
Slip stitch to the next double crochet and chain 3.
Work 2 dc into the next Color B space, then chain 3.
Skip the first post in the next section and work 1 dc into the second post. Work 2 dc into the next space.
Repeat around. Bring Color A forward before joining the round.
Round 7: Color A
Slip stitch to the second post over and chain 3.
Work 1 dc into the next post, followed by 2 dc into the next space.
Bring Color B forward and chain 4. Skip the first post in the next section, then work 1 dc into the second post and 1 dc into the following post.
Work 2 dc into the next space. Chain 4 and repeat the arrangement around the round.
Round 8: Color B
Repeat the same construction used in Round 7, working with Color B.
Slip stitch to the second post over and chain 3. Work 1 dc into the next post and 2 dc into the next space.
Chain 4, skip the first post in the next section, and work 1 dc into each of the next two posts. Work 2 dc into the following space.
Continue around and join the round.
Continue Expanding the Pillow
From Round 9 onward, the pillow continues to grow through alternating Color A and Color B rounds.
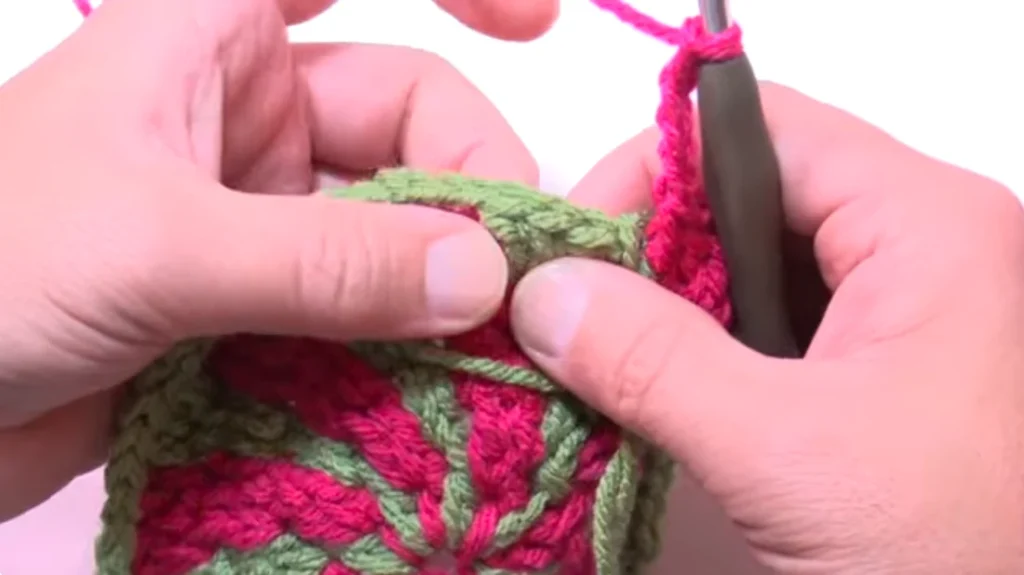
The basic arrangement remains the same: move to the working position, chain 3, work double crochet stitches across the available posts, and place 2 dc into the designated growth space. The connecting chain becomes longer as the rounds progress.
Before moving to the next section, bring the unused color forward. This keeps both colors accessible and helps maintain the interlocking appearance.
Use the following chain schedule for the expansion rounds:
| Round | Color | Connecting chain |
|---|---|---|
| 9 | A | Ch 5 |
| 10 | B | Ch 5 |
| 11 | A | Ch 6 |
| 12 | B | Ch 6 |
| 13 | A | Ch 7 |
| 14 | B | Ch 7 |
| 15 | A | Ch 8 |
| 16 | B | Ch 8 |
| 17 | A | Ch 9 |
| 18 | B | Ch 9 |
| 19 | A | Ch 10 |
| 20 | B | Ch 10 |
| 21 | A | Ch 11 |
| 22 | B | Ch 11 |
| 23 | A | Ch 12 |
| 24 | B | Ch 12 |
The number of double crochet posts in each section increases as the pillow expands. Remember that the beginning chain 3 counts as the first double crochet when following the stitch arrangement.
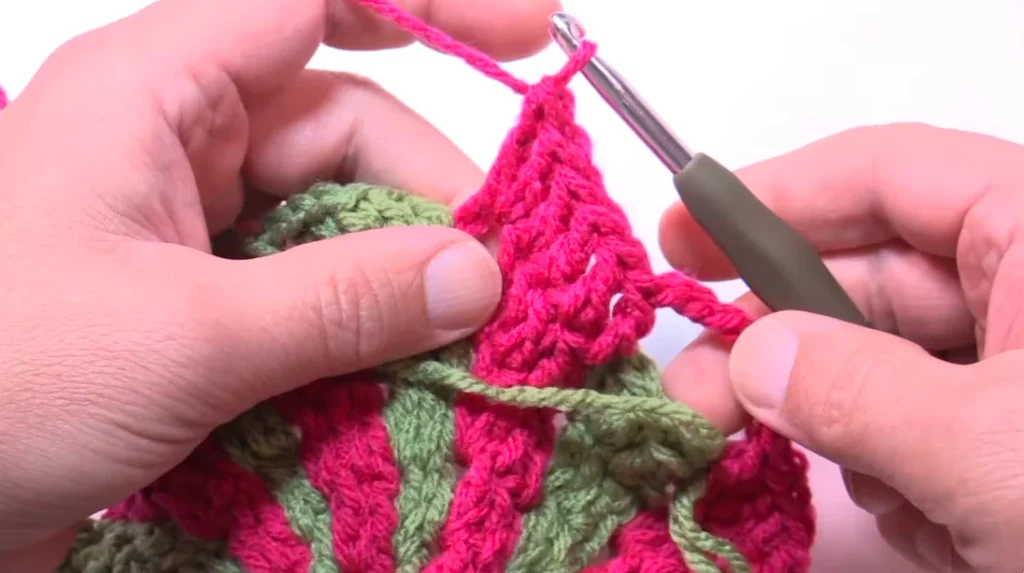
For the approximately 16-inch pillow, complete the expansion through Round 24. For the approximately 14-inch version, complete the expansion through Round 20 before moving to the decreasing section.
Start Decreasing the Pillow
For the 16-inch version, decreasing begins at Round 25. The chain spaces gradually become shorter, and the number of double crochets worked into each growth space is reduced.
The main change is that the designated growth space receives 1 dc instead of 2 dc. A beginning double crochet two together is also used to reduce the stitches.
Beginning Double Crochet Two Together
To make the beginning decrease:
- Chain 2.
- Yarn over and insert the hook into the next stitch.
- Draw up a loop.
- Yarn over and pull through 2 loops.
- Yarn over and insert the hook into the following stitch.
- Draw up a loop.
- Yarn over and pull through 2 loops.
- Yarn over and pull through the remaining loops on the hook.
This combines the first two stitches into one decrease.
After completing the beginning decrease, work across the remaining stitches. Place 1 dc into the designated chain space, then make the connecting chain for that round. When moving into the next section, skip the first combined decrease stitch and continue with the decrease arrangement.
Follow the chain schedule below:
| Rounds | Connecting chain |
|---|---|
| 25–26 | Ch 11 |
| 27–28 | Ch 10 |
| 29–30 | Ch 9 |
| 31–32 | Ch 8 |
| 33–34 | Ch 7 |
| 35–36 | Ch 6 |
| 37–38 | Ch 5 |
| 39–40 | Ch 4 |
Keep alternating Color A and Color B as you work through these rounds. Make sure you maintain the beginning decrease and work only 1 dc into each designated growth space.
Adjusting the Decreasing for a 14-Inch Pillow
If you are making the smaller, approximately 14-inch version, complete the expansion through Round 20.
Skip the additional expansion rounds and the first four decrease rounds. Resume the decreasing arrangement at Round 29, using the chain length and decrease method for that round.
Insert the Pillow Form
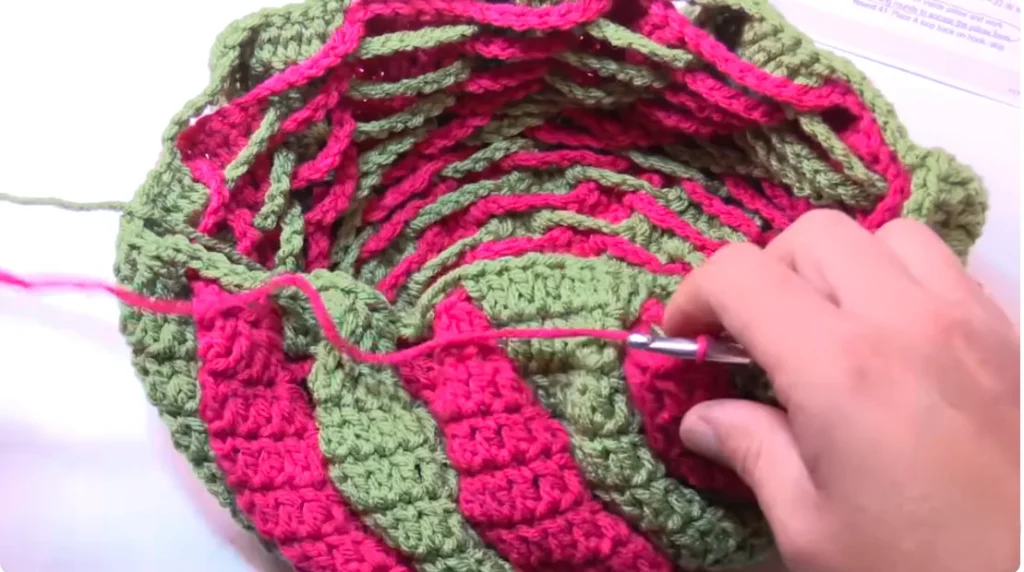
After Round 40, insert the round pillow form into the crocheted cover.
At this point, the cover should have developed into a bowl-like shape, with enough room to position the pillow inside. Adjust the fabric around the pillow form so it sits evenly and the crochet is not twisted.
Do not wait until the opening becomes too small. If the pillow form is difficult to insert, place it inside earlier and continue crocheting around it.
Complete the Final Decreasing Rounds
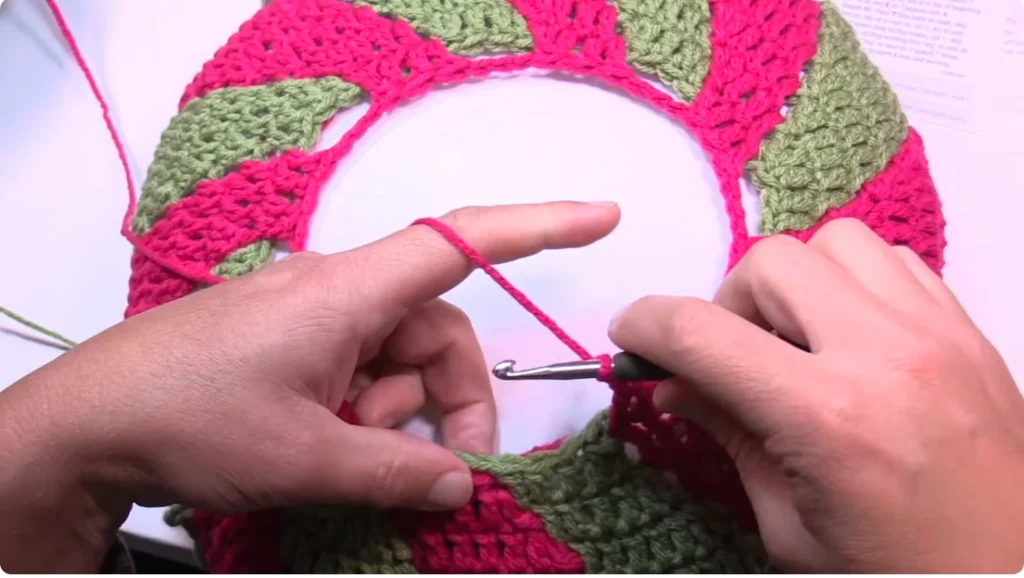
Continue alternating the two colors while gradually shortening the connecting chains.
The beginning double crochet two together remains part of the decreasing arrangement. Work 1 dc into the designated space and maintain the interlocking color sequence.
| Rounds | Connecting chain |
|---|---|
| 41–42 | Ch 3 |
| 43–44 | Ch 2 |
| 45–46 | Ch 1 |
For Rounds 41 and 42, continue the beginning decrease, work across the remaining stitches, and place 1 dc in the designated chain space. Chain 3 between sections.
For Rounds 43 and 44, continue the same decreasing method but shorten the connecting chain to 2.
For Rounds 45 and 46, reduce the connecting chain to 1 while maintaining the color arrangement. Keep the stitches reasonably firm as the opening becomes smaller.
Round 47: Final Round with Color A
Work the final round using Color A only.
Chain 3, counting it as the first double crochet. Work the remaining double crochet stitches around until you have a total of 8 dc.
Join with a slip stitch to the top of the beginning chain 3.
Fasten off and leave a long yarn tail. This tail will be used to gather the remaining center opening closed.
Finishing the Pillow
Secure Color B
Thread the Color B yarn tail onto a yarn needle.
Weave it through the Color B stitches only, avoiding the Color A sections. Work the yarn back and forth approximately three times to secure it, then trim the excess.
Close the Center Opening
Thread the long Color A tail onto your yarn needle.
Pass the needle through the remaining stitches around the center opening, collecting them one by one. Once you have gone around the opening, pull the yarn tail firmly to gather the stitches together.
Pass the needle through the loop to lock the closure, then weave the yarn back and forth several times to secure it.
Check that the opening is closed firmly and that both yarn tails are safely woven in.
Your peppermint pillow is now complete!

Tips for a Neat Finish
- Keep the colors separate: Work into the correct color’s stitches and spaces rather than combining the two sections.
- Bring the unused yarn forward: Do this before moving across to the next section so the yarn remains accessible.
- Check the chain spaces: The connecting chain length changes throughout the expansion and decreasing stages.
- Follow the decrease method carefully: Work the beginning double crochet two together and place only 1 dc into the designated growth space.
- Insert the pillow in time: Put the pillow form inside after Round 40, or earlier if the opening is becoming too small.
- Secure the center carefully: Pull the Color A tail tightly enough to close the opening and weave it securely.
Size Notes
This pattern is designed around an approximately 16-inch (40.5 cm) round pillow form.
- 16-inch pillow: Work the expansion through Round 24, begin decreasing at Round 25, and follow the complete 47-round construction.
- 14-inch pillow: Work the expansion through Round 20, skip the additional expansion and first four decrease rounds, then resume the decreasing arrangement at Round 29.
A smaller 12-inch variation may be possible, but a complete, verified round schedule is not available for that size.